Understanding if people engage with your content is important on several levels (including SEO-wise). For example, if someone searches Google, visits your page, spends 2 seconds on the page, and then returns to the search results, that can send horrible signals to Google. That’s called low dwell time and I’ve mentioned that many times before in my posts about Panda and Phantom.
So, to address the flaws of standard bounce rate, Google wrote a post in 2012 explaining the idea of “adjusted bounce rate” to get a more accurate feel for actual bounce rate. Using adjusted bounce rate (ABR), you can set a desired time threshold and fire an event after that time threshold is met. So if a user stays on the page for at least that amount of time, an event is fired via Google Analytics. And when an event is fired, that session will not be counted as a bounce. Cool workaround, right?
I’ve written several posts about setting up adjusted bounce rate. One covered the topic overall and then another focused on how to implement ABR via Google Tag Manager. But that’s for your standard website. Little did I know at the time another character would be entering the scene. Namely, AMP.
And Along Came AMP
As many of you know, Accelerated Mobile Pages (AMP) is becoming a big deal. Google is pushing AMP hard and many publishers are implementing AMP across their sites. Using AMP, you could create a lightweight version of your content using AMP HTML, Google will cache that page, and then it can be delivered to users on mobile devices very quickly.
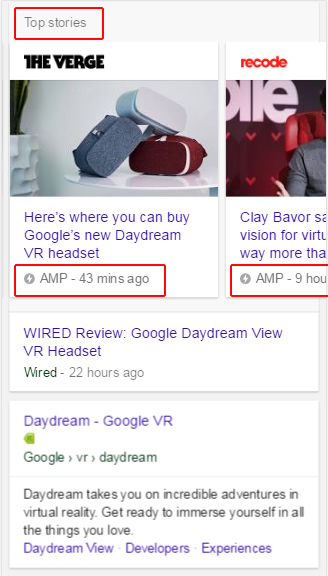
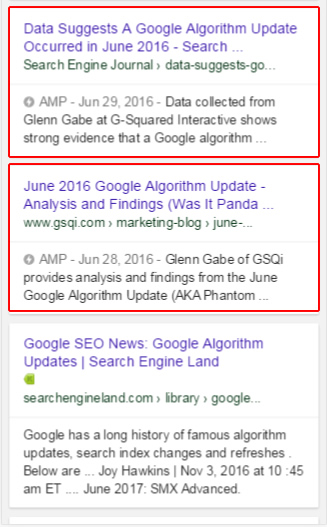
The median load time for all AMP delivered by Google is under one second. Yes, in aggregate! That’s super-impressive. By the way, you’ll know a result is AMP when you see the AMP icon (a lightning bolt) in the SERP listing like below. And no, many still don’t’ know that. You can read my post about the quick AMP survey I conducted later. :)
AMP in the Top Stories Carousel:
AMP in the “10 Blue Links” (in the Mobile SERPs):
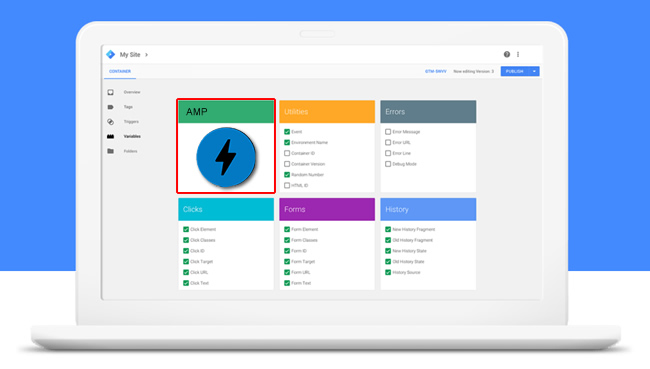
AMP Analytics and Google Tag Manager
With the release of AMP, tracking became a little tougher. So the AMP Project launched amp-analytics, which enables you to add tracking scripts from a number of popular analytics packages. That was a great start, but you still had to hack your WordPress theme a little to get everything to work. I know many business owners and webmasters were confused about the setup, and some hadn’t even set up tracking at all!
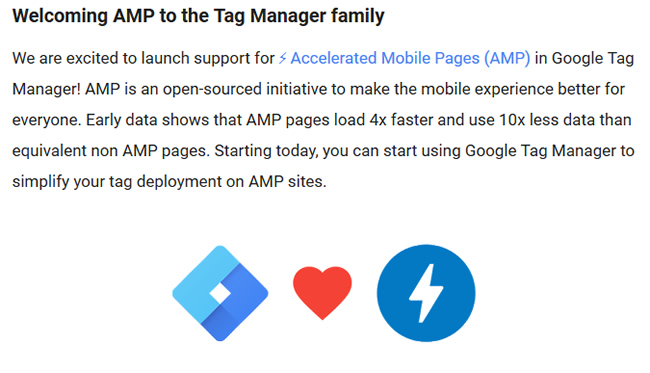
But then a big announcement was made that would make many people happy. Google Tag Manager now supports AMP! Using GTM, you can centrally manage all tracking scripts and then quickly deploy to all of your pages. So now with AMP, you can set up a separate container in Google Tag Manager, set up tracking tags, and click a button to deploy. Then poof, your latest tracking scripts will be deployed to your AMP urls. Awesome, right?
The announcement about GTM supporting AMP:
Adjusted Bounce Rate For AMP URLs
Back to adjusted bounce rate (ABR) for a second. Now that GTM supports AMP, some interesting tracking opportunities were opened up. First, now you can implement adjusted bounce rate on AMP urls! That’s awesome and will enable you to get a stronger feel for true bounce rate. Again, you can set the time threshold, and if users meet or exceed that time threshold on the AMP url, then an event is fired. Once the event is fired, the session isn’t counted as a bounce.
Below, I’ll walk you through how to set up adjusted bounce rate for your AMP urls. It’s a relatively quick process that will hopefully leave you loving Google Tag Manager, while also providing additional tracking data so you can analyze your accelerated mobile pages! Let’s begin.
How To Implement Adjusted Bounce Rate for AMP Using Google Tag Manager:
- Add a new container for AMP
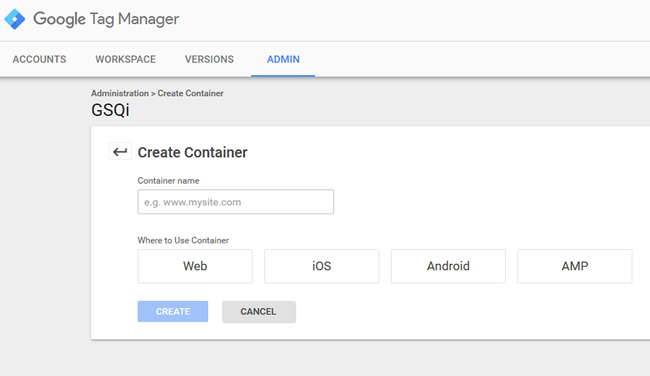
First, fire up Google Tag Manager and click the Accounts link in the navigation. You will see all of your accounts listed, along with the containers listed within them. Most people organize website or mobile applications by containers (so you will typically have one container per site or app). You need to set up a new container for your AMP tracking. Under the proper account, click the menu selector to the right (three dots) and select “New Container”. Once you do, name the container and select AMP under “Where to use container”.

- Install the Google Tag Manager (GTM) Code On Your Site
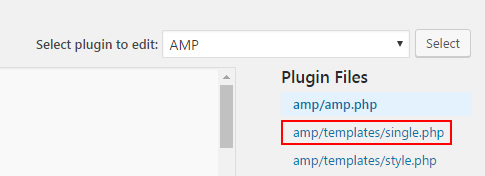
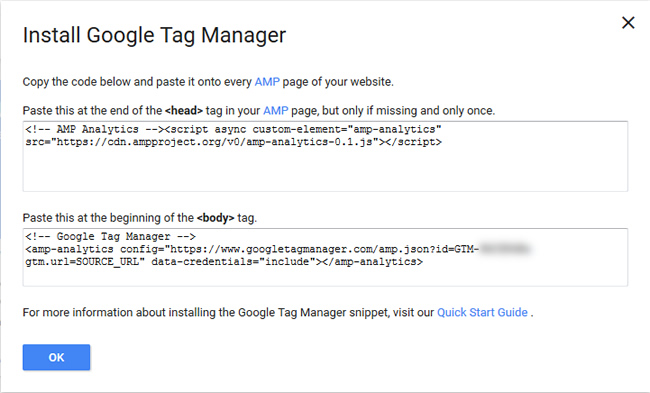
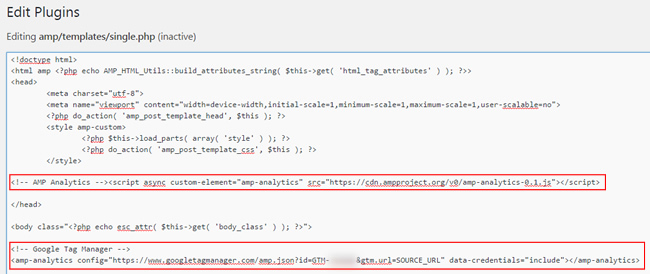
First, copy the AMP Analytics script and paste it in the <head> of your AMP file. That’s the first snippet of code listed in the screenshot below. And if you’re using the AMP WordPress Plugin, then add the code to the “single.php” file within the AMP plugin. You can find that under Plugins, and then by selecting “Editor”. Then choose the dropdown to select the AMP plugin. Again, the file you are looking for is “single.php” once you select the AMP plugin from the dropdown. See below.


- Next, Add GTM Code After <body> Tag
Next, copy the Google Tag Manager code (the bottom snippet from the screenshot above) and paste it right after the opening <body> tag on your page (or in the “single.php” file for the AMP WordPress plugin as mentioned above). Make sure you click Save to ensure the new code you added is saved in the plugin file.

- Set Up Pageview Tracking via GTM (default tracking)
If you are already using Google Tag Manager to track your AMP urls, then you can skip ahead to step 8. You probably already added a pageview tracking tag when doing that (hopefully). :) If this is the first time you are setting up GTM for AMP, then click the Tags link in the left-side navigation.

- Create A New Tag
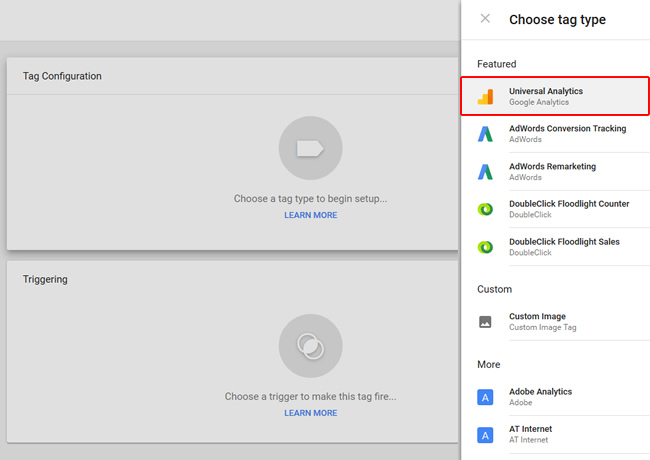
Then click “New” to create a new tag. Under Tag Configuration, click the tag icon and then select “Universal Analytics”.

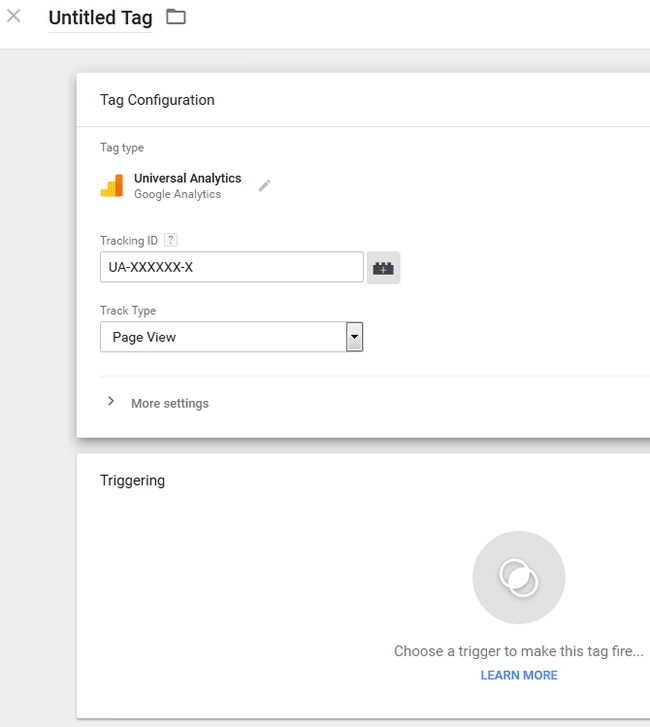
- Name Your Tag and Enter Tracking ID
First enter a name for the new tag in the upper-left corner. Then enter your tracking ID (UA-XXXX-X) and keep “Page View” as the Track Type.

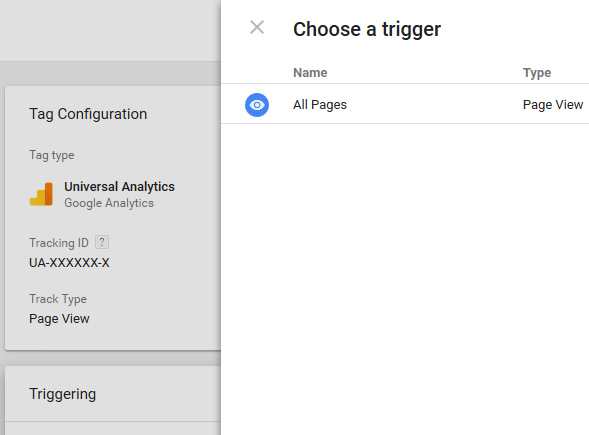
- Add A Trigger
Under “Triggering”, click the trigger icon and select “All Pages”. You want pageview tracking to occur on each page so you can track all of your AMP urls.

- Create An Adjusted Bounce Rate Tag
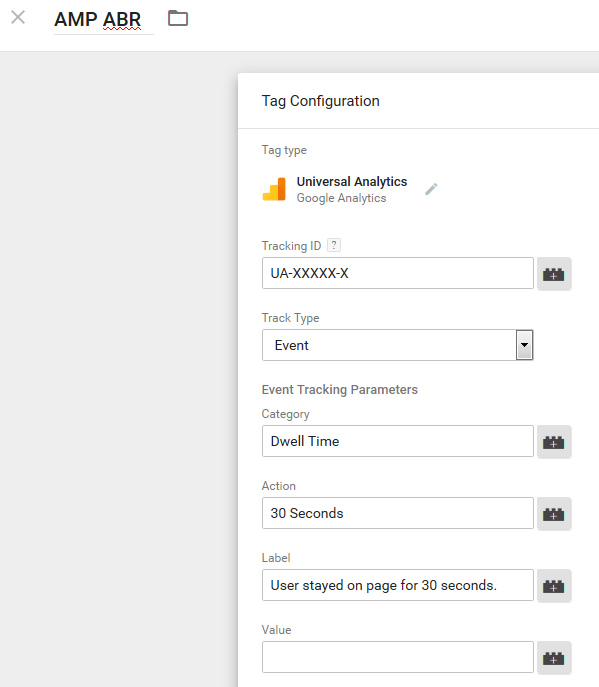
Now let’s create the tag that will track adjusted bounce rate (ABR). Click “New” to create a new tag. Click the tag icon and select “Universal Analytics”. Name your new tag in the upper-left corner and enter your tracking ID. For Track Type, select Event from the dropdown. Then enter the event details, which will show up in GA when the event is fired. For category, you can enter something like “Dwell Time”, the Action could be “30 seconds” (or whatever time you set up), and Label could be “User stayed for X seconds on AMP url.”

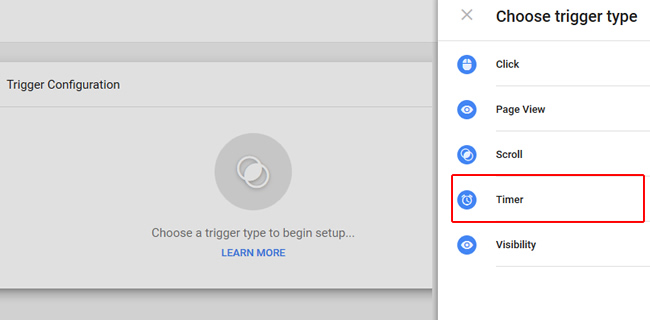
- Create A New Trigger
Under “Triggering”, click the trigger icon in the center of the page. Then click the + icon in the upper-right corner to create a new trigger. Then name the new trigger in the upper-left corner and click the trigger icon once again to set up the new trigger. Select “Timer” from the list of triggers.

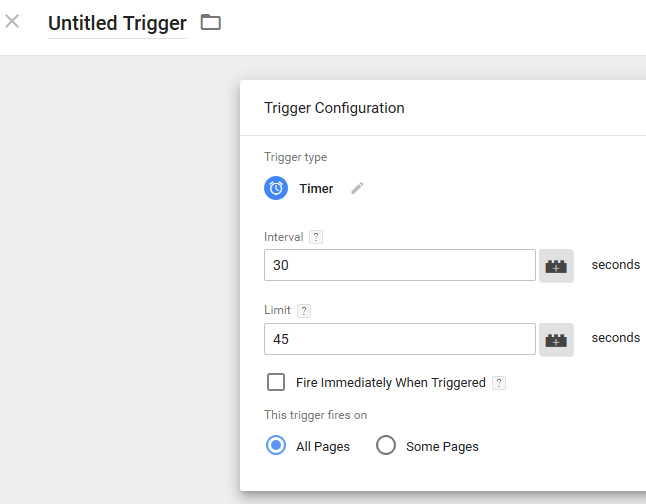
- Set Timing For ABR
Under Interval, enter the time to wait before firing the event. Since we’re tracking ABR, we only want to fire this once. So if you wanted to wait 30 seconds, then enter 30 in the Interval field. For Limit, enter the maximum number of seconds you want GA to fire the event. So if you set 30 for interval, I would enter something like 45 to ensure a second event isn’t fired. Also, uncheck “fire immediately when triggered”. This will ensure that GA waits for the selected interval to pass before firing. That’s what we want. And last, make sure “All Pages” is selected at the bottom where it says “This trigger fires on”.

- Preview and Debug (Kind of…)
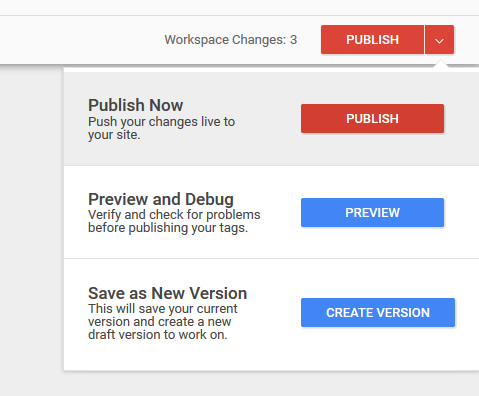
When using Google Tag Manager, you would typically “preview and debug” to test out the tags that are firing before publishing to your site. But for some reason, this is not working for me with AMP. I’ll reach out to some people on the AMP team about this and will update my post when I hear back.So for now, you could click “Publish”, which will deploy your new tags to your AMP urls. Once that’s completed (in a few seconds), you can go and test out your AMP tracking setup.

- Congratulations! (but you’re not done yet…)
You have deployed adjusted bounce rate tags to your AMP urls, but let’s make sure everything is working as expected.

Testing Your Adjusted Bounce Rate Setup Via Tag Assistant and Real-time Stats
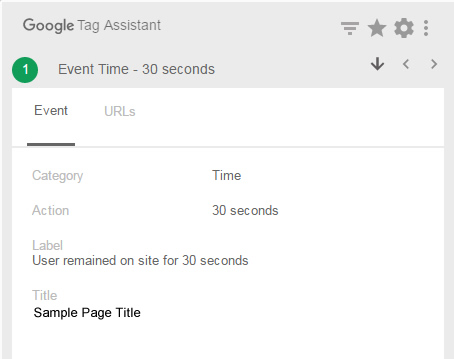
There are several ways you can check to make sure your ABR tag is firing. Google Tag Assistant is a great way to do so! It’s a Chrome extension that enables you to check GA tagging on specific pages, which tags are installed, what’s firing, etc.
If you navigate to an AMP url on your site, you should see Tag Assistant light up with a number that shows how many tags are installed on the page. If you click that icon, then you will see details about pageviews firing, events that are firing, etc.
If you click the Google Analytics tag in Tag Assistant, you will see the pageview that fired, and if you wait 30 seconds (or whatever time you set for adjusted bounce rate), you should see an event fire. If you click that event, you’ll see the category, action, and label. And if you see that, then ABR is working as expected!
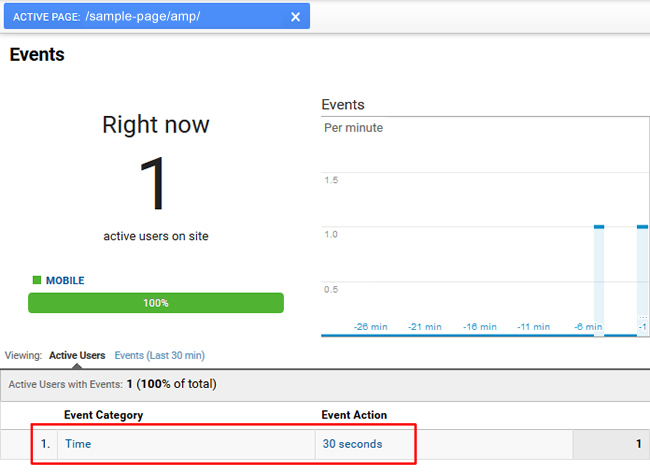
Real-time Stats in GA
Another way to check that ABR is firing on AMP urls is to fire up real-time stats in Google Analytics. Then go visit an AMP page, watch it show up in real-time stats, and then filter by events. Wait for your ABR event to fire and you should see the event show up in the reporting, along with the category, action, and label.
Summary – You Can Now Track Adjusted Bounce Rate for AMP
Although many have set up adjusted bounce rate on their standard websites, there hasn’t been an easy way to do that for AMP. But now that Google Tag Manager supports AMP, you can set up ABR for your AMP urls. Using the approach I listed above, you can track adjusted bounce rate for AMP urls just like your other pages. Once you do, you can get a stronger feel for actual bounce rate on AMP urls (which takes dwell time into account). After checking adjusted bounce rates for AMP pages, you might find users are engaging with your content, or you might find they’re not. But you won’t know until you try. :)
GG
Thanks, Glen. Great info!
I’ve been using GTM with AMP for a few weeks now, but actually haven’t ever set up adjusted bounce rate (AMP or standard). This will be a good opportunity to do that.
I’ve actually implemented AMP in a non standard way. I converted my WordPress theme to AMP, so the whole WP install is valid AMP.
I haven’t run into any problems. I feel like it’s been a straightforward way to optimize for speed. With the AMP html plus a caching plugin, pages are loading usually around a half a second.
I can also see in search console that crawling efficiency has improved. So far, all good things!
Thanks Badi. I’m glad you found my post about ABR via GTM valuable! And thanks for the info about your site. That’s an interesting setup for sure! Can you email me the domain so I can quickly check it out?
I’m very interested in AMP (speed optimization) and GTM, so this is al right up my alley! And I just messaged you the site on Twitter.
Awesome tutorial, Glenn! I set it up via the AMP for WP plugin (deleted the analytics setup and added the GTM values) and analytics works like a charm but GTM gives me errors. A non-standard implementation and Invalid or Missing Account ID. I hope I didn’t mess up the GTM implementation… ;) AMP has not been kind to my biggest site and I wish I would have found your post before implementing!