
Boosting Facebook posts to custom audiences is a great way to reach a targeted audience (and at a relatively low cost). Many people running Facebook pages don’t realize this, but you don’t have to boost a post simply to your fanbase. Instead, you can boost a post to any custom audience you have set up in Facebook. That includes people on your email list, people that have visited your website, and any lookalike audiences you have created. That’s where the true power lies.
By boosting to a custom audience, you are getting in front of people that already know of your brand, have engaged with your company in the past, etc. Your boosted posts can show up in the News Feed (both desktop and mobile), and you’ll find boosting an incredibly cost-effective way to advertise. In my experience, boosting to a custom audience has yielded strong engagement with low cost. And that’s a great combination for any advertiser.
The Problem – How Traditional Boosted Posts Work
So you can tell I’m a big fan of boosting posts, but I haven’t explained the part of boosting that annoys the heck out of me. When you boost a post the traditional way (right from your Facebook page), you don’t have many targeting options available. You can select a single custom audience, but you cannot combine that custom audience with other targeting options. That means that you might not be able to gain the momentum you might be looking for from the boost. For example, wouldn’t it be great to boost a post to multiple lookalike audiences all at one time?
The only way to target another custom audience for a traditional boost is to change the targeting down the line (you can switch from one custom audience to another, but you can’t combine them.) Here’s an example of “resetting” the targeting for a boost down the line:
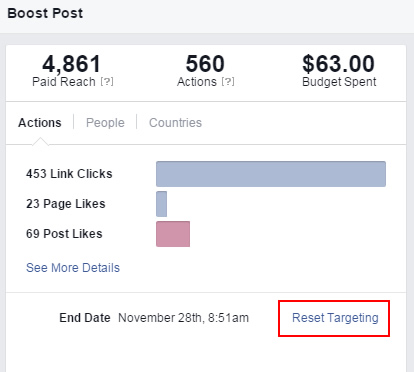
From an overall targeting standpoint with traditional boosted posts, you can’t geotarget by country or city, you can’t layer on other targeting like demographics or interests, and you can’t select multiple custom audiences at one time. And if you’re targeting lookalikes (which are currently built by country), you cannot target multiple lookalike audiences to reach several countries at one time. So boosting is great, but there are limitations… until you learn what I’m about to show you. :)
Can You Boost A Single Post To Multiple Target Audiences At One Time?
Yes, you can. And I find many people don’t even know it’s possible. But you can’t accomplish this by using the traditional method for boosting Facebook posts. But, by using Ads Manager or Power Editor, you can boost a post by creating a specific campaign for the boost. And when you do, you have all the power of Facebook ads combined with the power of custom audiences. You’ll be able to set up multiple ad sets with their own targeting, you’ll have many more targeting options available, and you’ll be able to target multiple audiences (in multiple countries) from the boost all at one time.
What About Likes, Shares, and Comments? Where Will They Show Up?
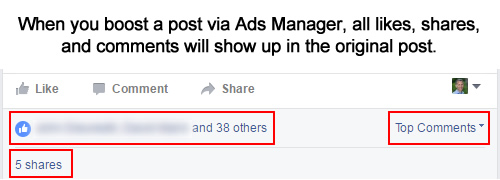
It’s important to know that all likes, shared, and comments from your boosted posts will show up in the original Facebook post (when boosted via Ads Manager). I know some people think that since you are creating ads via Facebook Ads Manager that any likes, shares, and comments will not show up in the original post. That’s not true… they definitely will. For example, see the screenshot below.
How To Set Up a Boosted Post Campaign Via Ads Manager
Let’s say you just posted a new update on your Facebook page and you want to boost that post. But, you want to boost the post to multiple custom audiences, including lookalikes from across multiple countries, all at one time. Good luck trying to do that with a typical boost.
Instead of using a traditional boost, we’re going to set up a campaign in Ads Manager for boosting the post. And when we do, we’ll be able to set up multiple ad sets, combine audiences, and reach multiple lookalike audiences across countries, all in one shot. Here we go.
1. Set Up Your “Boosted Posts” campaign.
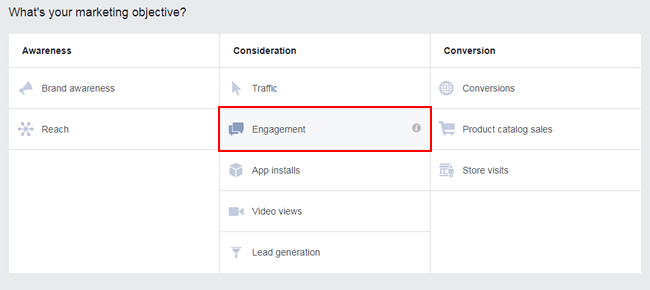
Go to Ads Manager and create a new campaign. Choose the consideration marketing objective and “Engagement” which uses the page post engagement objective. Give your campaign a name at the bottom of the screen and click continue.
2. Define Your Audience
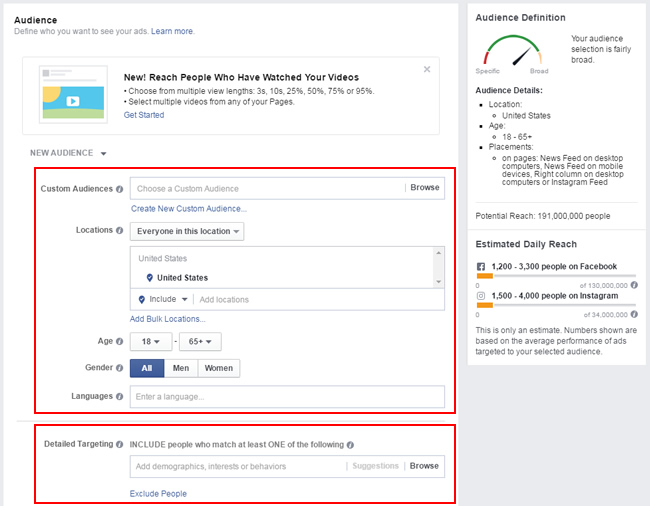
OK, this is one of the core reasons to use Ads Manager to boost an update. This is where you can select your custom audiences, combine those audiences, target lookalikes across multiple countries, etc. You also have tight control over geotargeting. For example, you can even target specific cities within a country if you want. You can also layer on additional targeting, like age, gender, language, and interests. Seriously, you have killer options here compared to simply boosting a post.
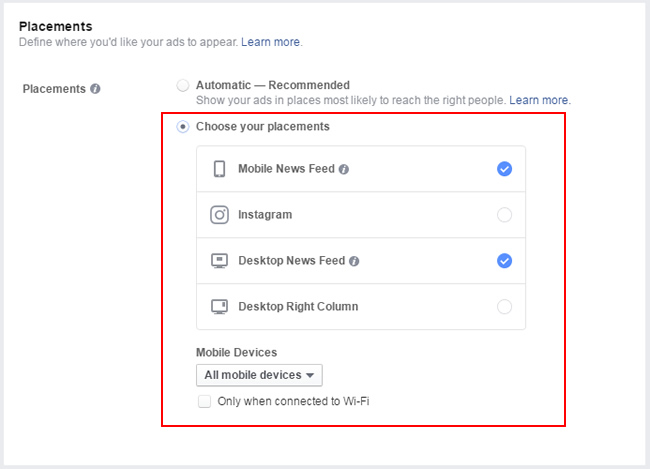
3. Choose Placements
Next you can choose where your boosted posts show up in Facebook. I typically select both desktop and mobile News Feed, but you also have options for Instagram and Desktop Right Column.
4. Budget and Schedule
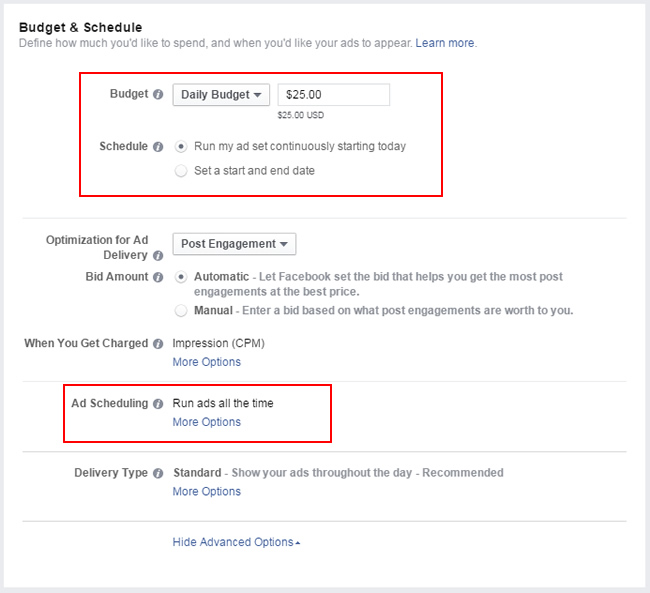
You’ll notice you have much more control over your budget and scheduling when boosting a post via Ads Manager. You can set your budget, the type of optimization for ad delivery, you can use ad scheduling if you use the lifetime budget option, you can set delivery type, and more. I told you that you’ll have more control… Once you’re done, click continue.
5. Select Creative
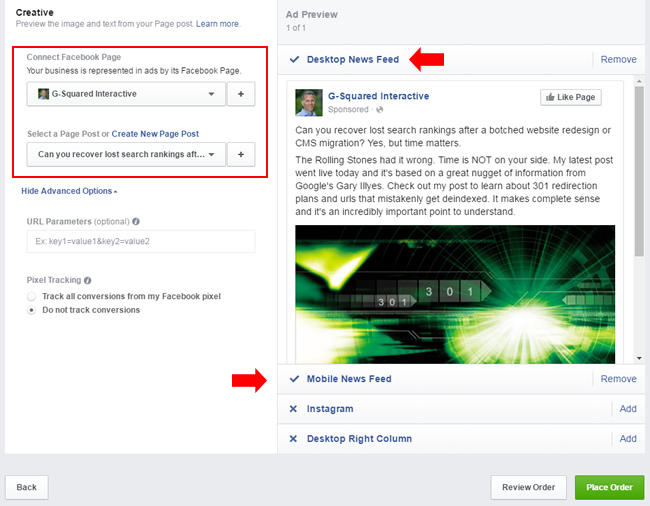
Now you can select the Facebook post that you want to boost. You can also create a post to boost if you want to start fresh. For this example, select the Facebook page you want to use, and then select a post to boost. Once selected, you’ll see the post show up in the ad preview area. That’s where you can preview the boost across the placements you selected in step three (Desktop News Feed, Mobile News Feed, etc.)
6. Review Your Order
I typically click “Review Order” at the bottom of the window to make sure everything looks ok before launching the campaign. If everything looks good with your settings, then click “Place Order”. Once you do, the boost will go into review, and it should go live shortly.
Bonus: Create Additional “Boosted” Ad Sets
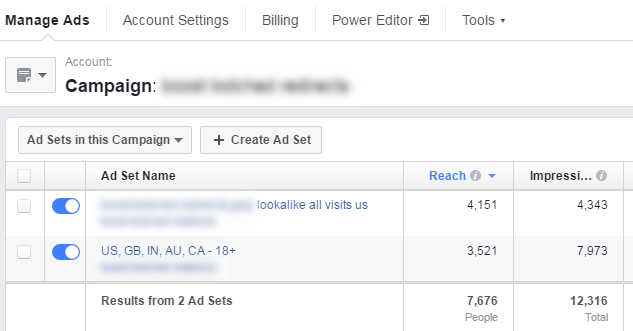
Since the boost was created in Ads Manager as a typical Facebook campaign, you’ll notice there is an ad set created for you. Targeting and budget are completed at the ad set level, so you can actually duplicate that ad set to target multiple audiences and countries by ad set if you want. You can also set different budgets per ad set. Again, you have much greater control by using Ads Manager.
For example, maybe you want to have ad sets by country so you can analyze each one at a granular level. You can also have greater control over budget by using multiple ad sets. And once again, it’s important to know that you cannot accomplish this with a typical boosted post. Here’s an example of multiple ad sets for a boosted post targeting separate custom audiences with distinct budgets.
A Note About Power Editor and Boosted Post Campaigns:
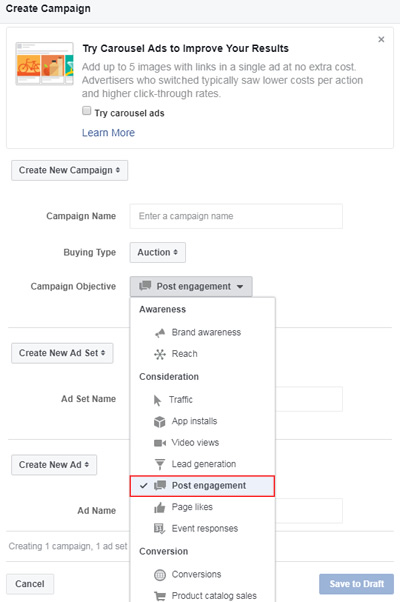
For those of you that love Power Editor (PE), you can absolutely set up boosted post campaigns in PE (using the page post engagement objective). The process is slightly different, and a little more involved, but you can definitely achieve exactly what I explained in this post when using Power Editor. I won’t provide the step-by-step instructions in this post, but just know that you can create boosted post campaigns via both Ads Manager and Power Editor. Here’s a screenshot from Power Editor where you can see the option for “Post Engagement”.
Summary – Hack Those Boosted Posts!
After reading this post, I hope you see the power of boosting Facebook posts via Ads Manager or Power Editor. By doing so, you have much more control over custom audience targeting, geographic targeting, demographic targeting, budget, and more. Boosting posts via Ads Manager definitely enables you to overcome some of the shortcomings of a traditional boost. I recommend trying it out soon and testing out various options. I think you’re going to dig it. Boost away.
GG
