Every webmaster has to deal with a website redesign or migration at some point. And redesigns and migrations often mean that your URL structure will be impacted. From an SEO perspective, when URL’s need to change, it’s critically important that you have a solid 301 redirection plan in place. If you don’t, you can pay dearly SEO-wise.
I wrote a post for my Search Engine Journal column last spring titled “How to Avoid SEO Disaster During a Website Redesign” and implementing a 301 redirection plan was one of the most important topics I covered. I find many webmasters and marketers don’t understand how SEO power is built URL by URL. As your URL’s build up inbound links and search equity, it’s important that those URL’s maintain those links and equity. If you change those URL’s, you must notify the search engines where the old content moved to, and that’s where 301 redirects come into play.
So, when you change URL’s, you run the risk of losing all of the links pointing to the older URL’s, and the search power that the URL’s contained. That’s unless you 301 redirect the old URL’s to the new ones. A 301 redirect safely passes PageRank from an old URL to a new one (essentially maintaining its search equity).
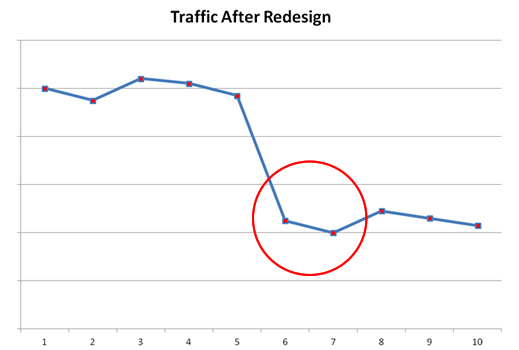
Unfortunately, I’ve seen many companies either not set up a redirection plan at all, or botch the plan. That’s when they end up with a catastrophic SEO problem. Rankings drop quickly, traffic drops off a cliff, sales drop, and nobody is happy at the company (especially the CMO, CFO, and CEO).
Meet the False Negative Redirect Problem, A Silent Killer During Redesigns or Migrations:
Needless to say, properly setting up your redirects is one of the most important things you can do when redesigning or migrating your website. That said, even if you address redirects and launch the new site, how do you know that the redirects are in fact working? Sure, you could manually check some of those URL’s, but that’s not scalable. In addition, just because an older URL 301 redirects to a new URL doesn’t mean it redirects to the correct URL. If you don’t follow through and check the destination URL (where the redirect is pointing), then you really don’t know if everything is set up properly.
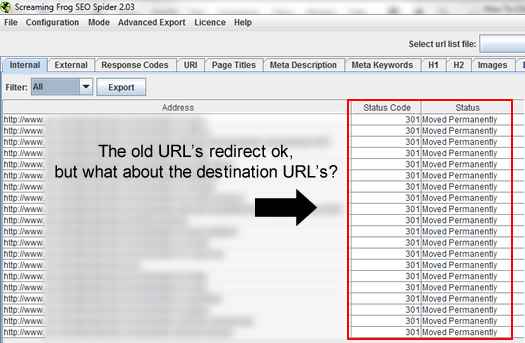
This is what I like to call the False Negative Redirect Problem. For SEO’s, a false negative occurs when your test incorrectly shows that the redirects are working properly (they don’t test positive for errors), when in fact, the destination URL’s might not be resolving properly. Basically, your test shows that the redirects are ok, when they really aren’t. Incorrectly thinking that 301 redirects are working properly by only checking the header response code for the old URL can trick webmasters into believing the redesign or migration has gone well SEO-wise, when in reality, the destination URL’s could be 404’ing or throwing application errors. It’s a silent killer of SEO.
How To Avoid the Silent SEO Killer When Changing Implementing Redirects
The false negative problem I mentioned above is especially dangerous when changing domain names (where you will often implement one directive in .htaccess or ISAPI_Rewrite that takes any request for a URL at one domain and redirects it to the same URL at another domain). Just because it 301’s doesn’t mean the correct URL resolves. Think about it, that one directive will 301 every request… but you need to check the destination URL to truly know if the redirects are working the way you need them to. Unfortunately, many SEO’s only check that the old URL’s 301, but they don’t check the destination URL. Again, that could be a silent killer of SEO.
Screaming Frog Hops to the Rescue
I mentioned “scalable” solutions earlier. Well, Screaming Frog provides a scalable solution for checking redirects during a migration or website redesign. Note, Screaming Frog is a paid solution, but well worth the $157 annual fee. Using Screaming Frog, you can import a list of old URL’s from your analytics package or CMS and have it crawl those URL’s and provide reporting. Running a two-step process for checking redirects and destination URL’s can help you understand if your redirects are truly working. For example, you might find redirects that lead to 404’s, application errors, etc. Once you find those errors, you can quickly change them to retain search equity.
Below, I’m going to walk you through the process of exporting your top landing pages from Google Analytics and checking them via Screaming Frog to ensure both the redirects are working and that the destination URL’s are resolving correctly. Let’s get started.
What You’ll Need and What We’ll Be Doing
- First, we are going to export our top landing pages from Google Analytics.
- Second, we’ll use the CONCATENATE function in Excel to build complete URL’s.
- Next, we’ll add the URL’s to a text file that we can import into Screaming Frog.
- Then we’ll fire up Screaming Frog and import the text file for crawling.
- Screaming Frog will crawl and test those URL’s and provide reporting on what it finds.
- Then we can export the destination URL’s we find so we can make sure they resolve correctly. Remember, just because the old URL’s 301 redirect doesn’t mean the destination URL’s resolve properly. We are hunting for false negatives.
- Last, and most importantly, you can fix any problematic redirects to ensure you maintain search equity.
How To Use Screaming Frog to Hunt Down False Negatives:
- Export Top Landing Pages from Google Analytics
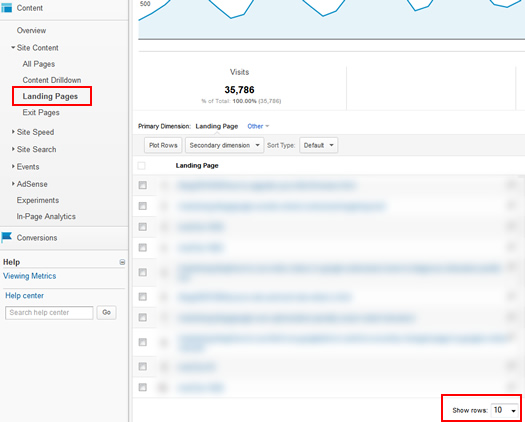
Access your Google Analytics reporting and click the “Content” tab, “Site Content”, and then “Landing Pages”. Click the dropdown for “Show rows” at the bottom of the report and select the number of rows you want to view.
Tip:
If you have greater than 500 pages, then you can edit the URL in Google Analytics to display greater than 500 URL’s. After first selecting a row count from the dropdown, find the parameter named table.rowCount= in the URL. Simply change the number after the equals sign to 1000, 5000, 10000, or whatever number you need to capture all of the rows. When you export your report, all of the rows will be included. - Export the Report from Google Analytics
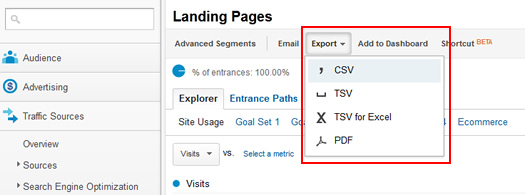
Click the Export button at the top of the report and choose “CSV”. The file should be exported and then open in Excel once it downloads.

- Use Excel’s CONCATENATE Function to Build a Complete URL
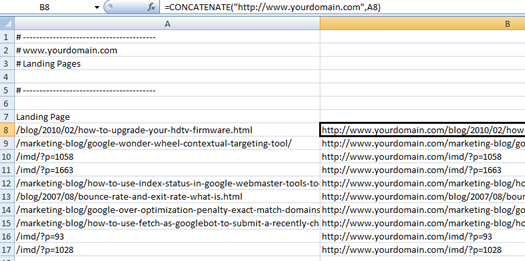
When the URL’s are exported from Google Analytics, they will not include the protocol or domain name. That’s the beginning of a URL with http://www.yourdomain.com. Therefore, you need to add this to your URL’s before you use them in Screaming Frog. Excel has a powerful function called CONCATENATE, which lets you combine text and cell contents to form a new text string. We’ll use this function to combine the protocol and domain name with the URL that Google Analytics exported.Create a new column next to the “Landing Page” column in Excel. Click the cell next to the first landing page URL and start entering the following: =CONCATENATE(“http://www.yourdomain.com”, A8). Note, change “yourdomain.com” to your actual domain name. Also, A8 is the cell that contains the first URL that was exported from Google Analytics (in my spreadsheet). If your spreadsheet is different, make sure to change A8 to whichever cell contains the first URL in your sheet. The resulting text should be the complete URL (combining protocol, domain name, and URL exported from Google Analytics). Then you can simply copy and paste the contents of that cell (which contains the formula) to the rest of the cells in that column. The formula will automatically adjust to use the right landing page URL for that row. Now you have a list of all complete URL’s that you can import into Screaming Frog.

- Copy all URL’s to a Text File
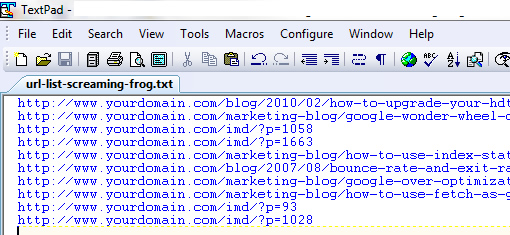
Since all we want are the URL’s for Screaming Frog, you can select the entire new column you just created (with the complete URL’s) and copy those URL’s. Then open a text file and paste the URL’s in the file. You can use Notepad, Textpad, or whatever text editor you work with. Save the file.
- Fire Up Screaming Frog
After launching Screaming Frog, let’s change the mode to “list” so we can upload a list of URL’s. Under the “Mode” menu at the top of the application, click “List”, which enables you to use a text file of URL’s to crawl. Then click “Select File” and choose the text file we just created. Then you can click “Start” and Screaming Frog will begin to crawl those URL’s.
- Review Header Response Codes From the Crawl
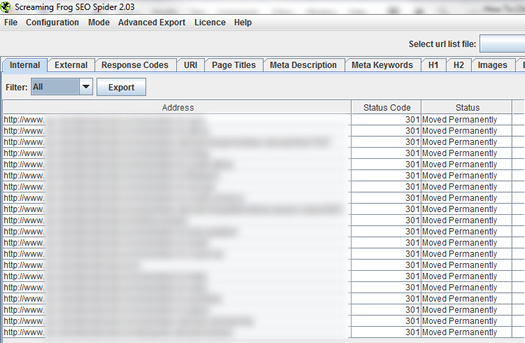
At this point, you will see a list of the URL’s crawled, the status codes, and the status messages. Remember, all of the URL’s should be 301 redirecting to new URL’s. So, you should see a lot of 301’s and “moved permanently” messages. If you see 404’s at this point, those URL’s didn’t redirect properly. Yes, you just found some bad URL’s, and you should address those 404’s quickly. But that’s not a false negative. It’s good to catch low-hanging fruit, but we’re after more sinister problems.
- Find the Destination URL’s for Your Redirects
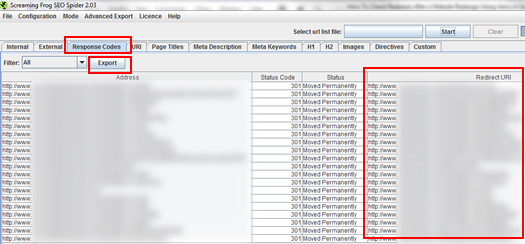
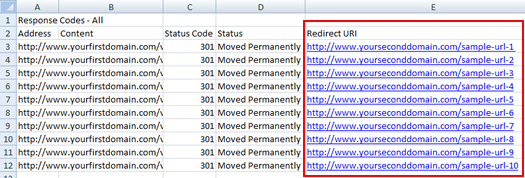
Now, just because you see 301 redirects showing up in the main reporting doesn’t mean the destination URL’s resolve correctly. If you click the “Response Codes” tab, you’ll see the redirect URI (where the 301 actually sends the crawler). THOSE ARE THE URL’S YOU NEED TO CHECK. Click the “Export” button at the top of the screen to export the “Response Code” report. This will include all of the destination URL’s.

- Copy All Destination URL’s to a Text File
In Excel, copy the destination URL’s and add them to a text file (similar to what we did earlier). Make sure you save the new file. We are now going to crawl the destination URL’s just like we crawled the original ones. But, this process will close the loop for us, and ensure the destination URL’s resolve correctly. This is where we could find false negatives.
- Import Your New Text File and Crawl the Destination URL’s
Go back through the process of selecting “List Mode” in Screaming Frog and then import the new text file we just created (the file that contains the destination URL’s). Click “Start” to crawl the URL’s, and then check the reporting.
- Analyze the Report and Find False Negatives
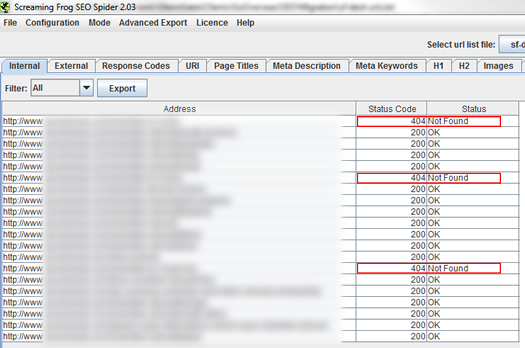
You should see a lot of 200 codes (which is good), but you might find some 404’s, application errors, etc. Those are your false negatives. At this point, you can address the errors and ensure your old URL’s in fact redirect to the proper destination URL’s. Disaster avoided. :)
Screaming Frog and Actionable Data: Beat False Negatives
Going through the process I listed above will ensure you accurately check redirects and destination URL’s during a website redesign or migration. The resulting reports can identify bad redirects, 404’s, application errors, etc. And those errors could destroy your search power if the problems are widespread. I highly recommend performing this analysis several times during the redesign or migration to make sure every problem is caught.
Make sure you don’t lose any URL’s, which can result in lost search equity. And lost search equity translates to lower rankings, less targeted traffic, and lower sales. Don’t let that happen. Perform the analysis, quickly fix problems you encounter, and retain your search power. Redesigns or migrations don’t have to result in disaster. You just need to look out for the silent SEO killer. :)
GG


Hi Glenn,
Is that upload .txt file is available only for paid subscribers? I uploaded .txt file & also .csv file but it says not valid. Would love to check this false negatives. Is there some alternative available?
Thanks.