
For years I’ve been using a short branded domain name combined with bitly to shorten links I share across social media. For example, I registered glennga.be as the short domain name, and whenever I share a link on Twitter, that’s the domain name in the urls for all shares.
Here’s a quick example that leads to one of my recent blog posts: http://glennga.be/24GmaI3. When clicking that link, users are taken to my post, but the link that gets shared is branded. It’s a popular way for companies to keep their brand in front of a lot of people. Again, many have set this up through bitly, which handles and tracks shortened links.
Now, setting up and using a short branded domain name is often one of those things that simply never gets revisited. You know, you set it up, it works great, and you just assume it will always work. Well, THINK AGAIN. Bitlygeddon is upon us.
Bitlygeddon – Poof, your links will stop working on 6/29/16
We are quickly approaching what I’m calling Bitlygeddon, or the day that many heavy social media users realize that all of their shortened links using a branded domain name stopped working. Poof, they’re dead.
That’s because bitly is moving to a new hosting provider and the IP address you originally used to set up your branded short domain name is changing. Actually, there are two IP addresses now that you can use. And without changing your A record for the branded domain name, your links will not resolve starting on June 29, 2016. Yes, that means you have to change DNS settings, and soon.
So, you might still be sharing links like crazy on Twitter, but those links will not lead anywhere after 6/29 if you don’t make the necessary changes. Embarrassing, right? And then you’ll be scrambling to make the change, only to be confused with how to do it. Therefore, I decided to write this post to 1) remind you that you need to make the change, and 2) explain a little more about how to change your A record.
Note, I made the necessary changes this past weekend. Once I knew where to go and exactly which settings to change, it only took a few minutes. I’ll cover more about this below.
Bitly Documentation
If you’re like many heavy social media users, you set up your short branded domain name a long time ago. That means you might be confused with what you need to change, where those settings are, etc. Well, bitly did send out an email explaining more about the situation, as well as including a link to a blog post with instructions. I didn’t find the instructions to be perfectly clear, but they did get me moving in the right direction. The red underscore is from me, not bitly.

Action Item: So, the first thing you should do is visit the post and thoroughly read the instructions. There are also links to popular hosting providers and how to change the A record for your domain name. But again, you might still leave that post a little confused. Don’t worry, I’ll explain more about what to do.
Where To Make The Change – Your Hosting Provider
I’ve received a few emails about this situation and it seems that a confusing part of the process is understanding where to actually make the change. Many jump to their domain registrar (like GoDaddy or Network Solutions) thinking that’s where the change needs to take place. But when you get there and check the DNS settings for your branded domain, you’ll see this:
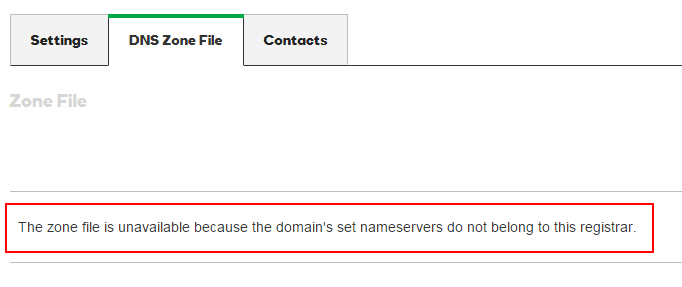
That’s right, since you set up your branded short domain name to point to your hosting provider, that’s where you will need to change the A record. So leave your domain name registrar and hop over to your hosting provider.
Once there, you will need to follow instructions specific to your hosting provider for changing the A record. Depending on how tech-savvy you are (or not), now might be a good time to call your hosting provider. They will know all about your domains and how to quickly change an A record. And for those of you that are tech-savvy, then just access your DNS settings for your branded short domain name and update the A record.
Action Item: Don’t jump to your domain name registrar to make the change. The changes need to be made at your hosting provider. Once you find your branded short domain name, you’ll need to update the DNS records, and specifically the A record settings.
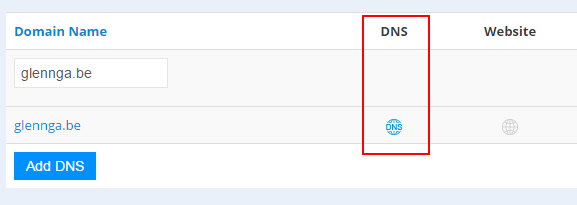
An example of what this looks like:
Once I accessed my admin settings at my hosting provider, I needed to update DNS settings for the branded domain. I did that by simply clicking the DNS link in my admin console.
Once in my DNS settings, I found the records that needed to be updated using the two new IP addresses that bitly is using. Remember, there are two new IP addresses, not one. So the first thing to do is to update the records that are present already for www and @. Note, I’m double-checking with bitly about the need to update the A record for @. I’m not sure if that’s necessary, but my original setup did have @ using bitly’s IP address. I’ll update this post once I hear back.
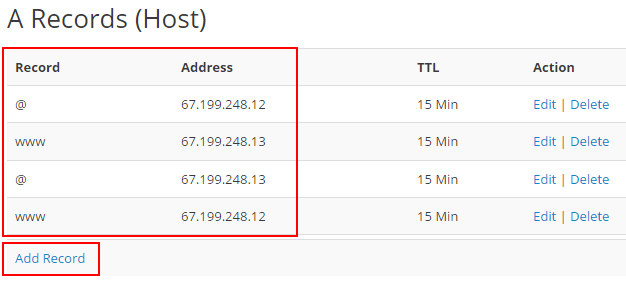
But again, bitly now has two IP addresses for redundancy purposes. For example, if one fails, the second will be used. That wasn’t the case in the past. But it’s important to note, since you need a second A record for each of the settings listed above. In order to do this, you need add another record via your admin console.
For my setup, I simply clicked “Add a record” and then entered the required information plus the second IP address. I completed this for both www and @.
Action Item: Make sure you update the IP addresses for the current A record for www and @, and if needed, make sure you add two A records for each of items I mentioned above (www and @) so you can include the second IP address that bitly provided. You should add both since bitly is using two IP addresses for redundancy purposes. This will ensure that if one fails, the other can be used as a backup (and your shortened links will still work).
Validate Via Bitly
The last item on our checklist is to validate that the changes are working via your advanced settings in bitly. You can access your advanced settings by clicking the hamburger menu in the upper right corner, clicking “settings”, and then “advanced settings”. Once you do, you’ll see a “Re-validate” button in your advanced settings. When you click that link, bitly will check to ensure all is set up properly.
Note, you can also just wait 24 hours for auto-validation, but why not just validate immediately to make sure all is ok? That’s what I recommend. Once you receive confirmation, you’re good to go. You are now safe from Bitlygeddon. :)

Summary – Beware, Bitlygeddon is Coming.
So now you’re up to speed on bitlygeddon, which is arriving on June 29, 2016. The good news is that you still have over two weeks before it arrives and the changes should only take a few minutes to complete. The bad news is that I fear many users will not know about the change and their short domain names will tank starting on 6/29. And if that happens, there won’t be much “sharing” happening with social sharing. Good luck and pass the news on to anyone you know with a short branded domain name using bitly. A few minutes now might save many in frustration down the line.
GG
Thank you for this savvy head’s up and how-to, Glenn! Bookmarked :)
Thanks Laura! I’m glad my post was helpful. The 29th will be here soon… so I hope everyone updates their short domain name. If not, there will be a lot of dead links. :)