In November of 2010, Google rolled out Product Listing Ads (PLA) to all U.S. advertisers. Product Listings Ads were a great addition to the AdWords arsenal, as they provide a stand-alone ad unit for products using photo thumbnails. The thumbnail is presented along with the product title, price, and merchant name. You can see an example of what a product listing ad looks like below.
Click the image below to view a larger version:
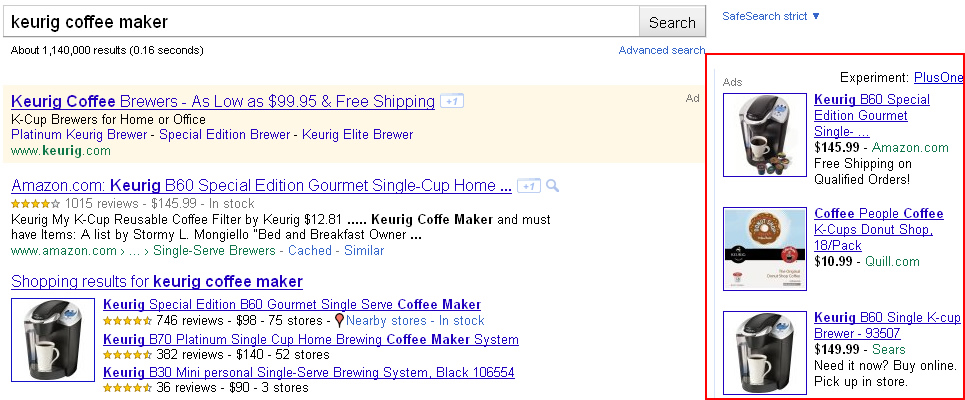
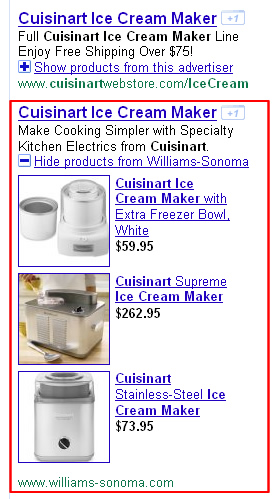
Product listing ads are used in conjunction with a Google Merchant Center Product Feed, similar to product extensions (which is an ad extension already available in AdWords). For product listing ads, advertisers don’t bid on keywords like they would with standard text ads. Instead, Google determines if there is a match between a query and the products listed in your feed. If there’s a match, Google may provide your product listing ad in the SERPs. To clarify the difference between product listing ads and product extensions, PLA’s are stand-alone image-based ads where product extensions simply extend a standard text ad with product information. You can see what a product extension looks like below.
An example of a product extension in Google AdWords:
Basic Setup of a Product Listing Ads
If you want to use product listing ads, you’ll first need an active Google Merchant Center Product Feed that you can connect with your AdWords account. You can connect the two accounts via your Google Merchant Center settings. Once you connect your merchant feed with your AdWords account, you’ll need to add a product extension in the campaign you want to set up product listing ads in. Once you add a product extension in a specific campaign, you can set up ad groups that contain product listing ads (which can then tap into the products in your merchant account feed).
For each campaign that you want to utilize your Merchant Center Product Feed, you’ll need to add a product extension at the campaign level. This product extension will use your newly connected feed as the source of products for both product listing ads and product extensions (if necessary). Note, both product extensions and product listing ads will be available at this point, since both leverage a connected Merchant Product Feed. Remember, product extensions simply extend text ads with product visuals and information, while product listing ads are stand-alone ad units. Both use your merchant account feed for product information.
Filters and Targets for Honing Your Product Listing Ads
OK, let’s say you have your Merchant Center Product Feed connected to your AdWords account and you set up a product extension in order to connect your product feed with a specific campaign. Although it’s fine to use product listing ads within your current campaigns, there are good reasons for setting up a new campaign just for product listing ads. This will enable you to set a budget for specific groups of products, set CPC’s per ad group, use filters and product targets to hone your ads, and create specific promotions for each ad. If you do end up creating specific campaigns for your product listing ads, you will probably want to get familiar with both filters and product targets. Filters enable you to show a subset of your Merchant Center Product Feed, while product targets enable you limit products by category, brand, etc. Both enable you to do some interesting things in your campaign, targeting-wise. Let’s explore both filters and product targets below.
Filtering Your Merchant Center Product Feed
Filters enable you to limit the products available to your campaign (and all ad groups within that campaign). You can add a filter when adding a product extension to your campaign. The filter you add will be based on your own specific product feed, so it’s important that your feed is well-structured. For example, if you sold men’s shoes, your feed might contain subcategories like dress shoes, slippers, sneakers, etc. If you wanted a specific campaign to only have access to dress shoes, then you could add a filter to make sure only dress shoes were available. Once you added this filter, all ad groups would be affected. That means that your ad groups could only trigger ads for dress shoes (via both product extensions and product listing ads).
Let’s add a filter:
1. Add a product extension at the campaign level.
2. After you connect your Merchant Center Product Feed, click the “filter” button.
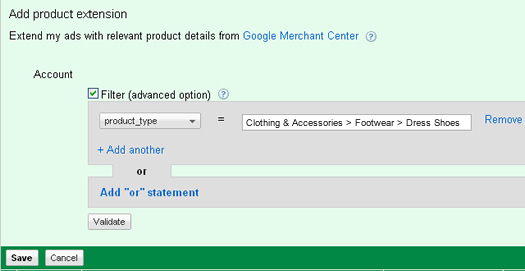
3. Based on your feed, you can add up to 10 OR statements to filter your products. For our purposes, we’ll use the product_type attribute to limit our feed to just dress shoes. Note, check out the merchant feed specification for more information about the various parameters available. In a perfect world you would match the product_type to Google’s own taxonomy. If you set up a custom taxonomy for products on your site, then you should provide a full breadcrumb trail.
4. That’s it. Now this specific campaign only has access to dress shoes listed in your feed.
More Targeting Via Product Targets
The filter we just set up is great, but filters apply to your entire campaign. What if you wanted to limit each ad group in your campaign to specific groups of products? This is where product targets come in very handy. In our example above, we limited the merchant feed for our campaign to dress shoes, which was a subcategory of men’s shoes. In each ad group, we could then further limit the feed to specific groups of products. Again, this would be based on your own specific feed, so it’s important that your feed is organized properly.
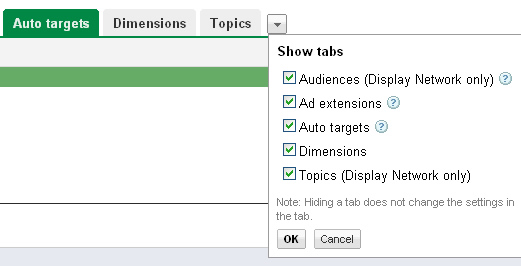
Using this approach enables you to set custom CPC’s for specific product groups, while also using specific promotions as part of your product listing ads. You can create product targets via the Auto Targets tab at the ad group level. If you don’t see the Auto Targets tab, make sure you enable it by clicking the arrow button at the far right of your tabs. Then clicks the checkbox for “Auto Targets”.
Accessing the Auto Targets Tab in Google AdWords:
For example, you could set up a series of ad groups that each targets a specific brand or subcategory within dress shoes. Each of those ad groups could use product targets that limit your product feed to specific groupings of products. So, filters can be used to limit products at the campaign level, where product targets can limit the resulting feed for ad groups.
Once you set up product targets, you could adjust CPC’s for each new ad group. This is smart, since various brands of shoes all have different levels of pricing. You might only want t bid $2.00 for one brand, while you might want to bid up to $6.00 for another. Using product targets enables you to do this.
Using Specific Promotions Per Ad Group
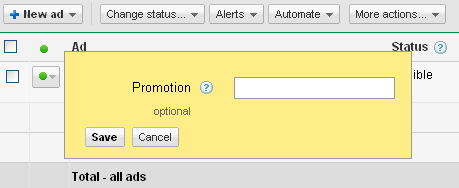
In addition, one you have this granular setup, you could set up specific promotions for each ad group. Promotions can be added to each product listing ad as a line of text (up to 45 characters). Promotions should be specific messages for prospective customers and are meant to highlight special promotions. For example, you could add “25% off all orders over $75”, “Buy 2 products, get 1 free”, etc. Promotions are not meant to include product copy or misc. benefits. Again, using promotions per ad group is smart since you might have different promotions and offers per brand or subcategory.
An example of a product listing ad promotion:
Setting Up Product Targets
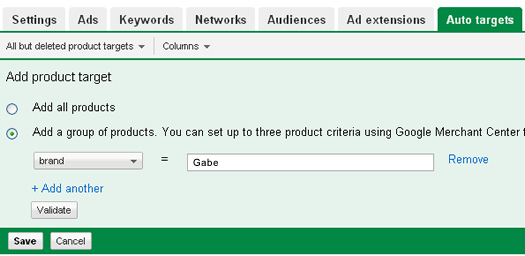
Let’s quickly set up a product target for an ad group that should only have access to a brand of shoes named Gabe. From what I hear, they are the best shoes around… Very high quality. :) We’ll set up an ad group within the campaign we have already been working in. That campaign has a filter already set that limits the merchant account feed to dress shoes. For our example, let’s say Gabe shoes is a brand within dress shoes.
1. Create an ad group for your product listing ad and don’t add any keywords. Remember, product listing ads don’t use keywords to trigger ads.
2. Click the Auto Targets tab and click the button labeled “Add product target”. Now you need to select the feed parameter you’ll use to limit your feed for this ad group. You can choose “Brand” from the dropdown and then enter “Gabe”. You can validate your selection and then click “Save”.
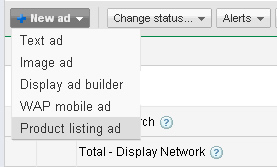
3. Now you need to create the actual product listing ad. Go to the Ads tab and click the button labeled “New ad”. Then select “Product listing ad”. This is where you can enter a specific promotion for Gabe shoes. Maybe you’re running 10% off all Gabe shoes this month. You can enter that text here, which can show up in your product listing ad. This is why I like having granular control of PLA’s. The promotion can be more relevant and targeted.
4. That’s it, now your ad group is set up to show just Gabe shoes as product listing ads. You can also set a custom CPC for Gabe shoes, which might be different than what you would bid for other brands. Last, you can present a special promotion just for Gabe shoes. Awesome.
Hone Your Targeting For Product Listing Ads
Like many other things in Paid Search, enhancing your targeting can pay huge dividends down the line. The proper setup can enable you to group products, create special promotions, and bid differently per product target. This will give you greater control over your product listing ads, which will enable you to optimize your efforts. I recommend reviewing your Merchant Center Product Feed to make sure it’s well-structured and optimized. Once it is, I would work on developing a campaign structure that makes sense, given your product line. Product listing ads can definitely give you an edge in Paid Search and I hope this post helps you enhance that “edge”. Good luck.
GG

What happens when you have two product targets that overlap? For example we have a product target simply for all products right now. If we want to segment that into different product groups so we can bid differently on product groups can we do that over time by creating say a Group 1 which is a subset of the All Products group and run them simultaneously?
Hi Jeremy.
I highly recommend breaking up your product line via product targets vs. having a full product feed target and a product-specific target at the same time. If you do run both at the same time, then they will essentially compete against one another when there is overlap.
I know it’s more work to break them all out, but I can tell you that it’s a much stronger way to go. It makes your analysis much easier, while giving you granular control over budget and offers. I hope that helps.
GG
Great article, helps with the setup for a new campaign. Thnx!
Thanks Roy. Glad to hear my tutorial was helpful. Both filters and product targets can be greatly useful when setting up Product Listing Ads.
GG