
Last month I published an article on Search Engine Land explaining how to use the new URL inspection API to build a multi-site indexing monitoring system. By using Analytics Edge in Excel with the new URL Inspection API from Google, you can check the indexing status for the most important urls across multiple sites on a regular basis (and all by just clicking a button in Excel). It’s a great approach and can help you nip indexing problems in the bud. Remember, if your pages aren’t indexed, they clearly can’t rank. So monitoring indexing is super important for site owners and SEOs.
After I published the article, it was great to see people in the industry test out this approach, and I’ve heard from quite a few that they use it on a regular basis. That’s outstanding, but I think systems like what I originally built can always be enhanced… As I was using the system to check indexing levels across various client sites, I came up with a simple, but powerful, idea for extending the system. And it relates to canonicalization.
First, it’s important to understand that rel canonical is just a hint for Google. I’ve covered that before in case studies, other blog posts, and heavily on Twitter over the years. Google can definitely ignore what site owners include as the canonical url and then choose a different urls (based on a number of factors). And when Google selects a different url as the canonical, you definitely want to know about that. That’s because the url being canonicalized will not be indexed (and won’t rank in the search results). This can be fine, or not fine, depending on the situation. But you definitely want to dig in to see why Google is choosing a different canonical than what you selected.
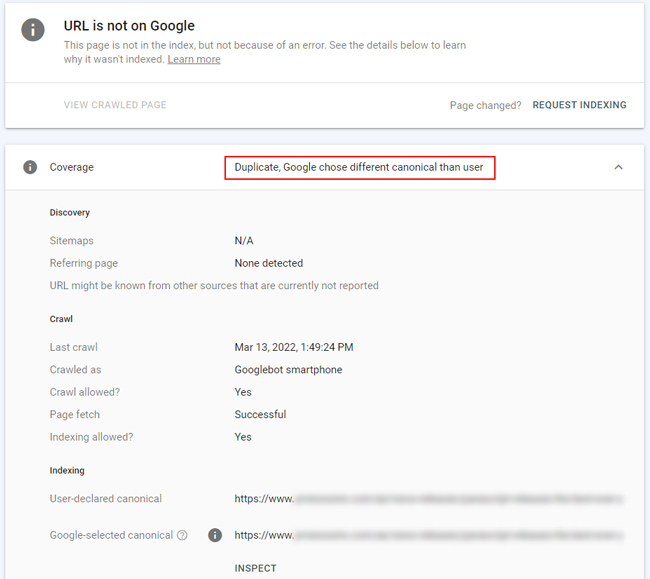
Luckily, the URL Inspection API returns both the user-selected canonical and the Google-selected canonical when inspecting urls. So, via some Analytics Edge magic, we can compare the two columns returned by the API as the urls are being processed, and flag that in our worksheets. It’s just another level of insight that can help you address indexing problems across the sites you are monitoring.
What we are going to achieve: Comparing canonicals via the URL Inspection API.
As I explained above, we are going to add another step in the indexing monitoring system to compare the user-selected canonical with the Googles-selected canonical. And we are going to dynamically create a new column in each worksheet that lets us know if there is a difference between the two.
And as a quick reminder, we will be doing this across all sites that are included in our indexing monitoring system (which can span as many GSC properties as you want). If you followed my original tutorial, then you can easily add this additional step in your system to check canonicalization across your top urls. And if you didn’t already set up an indexing monitoring system, then I would do that first and then come back to add this step.
With that out of the way, let’s enhance our system!
How to extend an indexing monitoring system by comparing Google-selected and user-selected canonicals:
1. Set up the foundational indexing monitoring system:
First, follow my original tutorial for setting up the indexing monitoring system. Once you have that up and running, we are going to add an additional step for comparing the user-selected and Google-selected canonical urls. And then we’ll dynamically create a new column in each worksheet called “Different Canonical” that flags if they are different.
2. Add a step to the macro in Analytics Edge:
In order to add another step to our macro in Analytics Edge, you simply run the macro to the point where the new instruction will be added and then add the new functionality. You can accomplish that via the “Step” button in the task pane. First, open your spreadsheet, click the Analytics Edge tab, and open the task pane (which holds your macros).

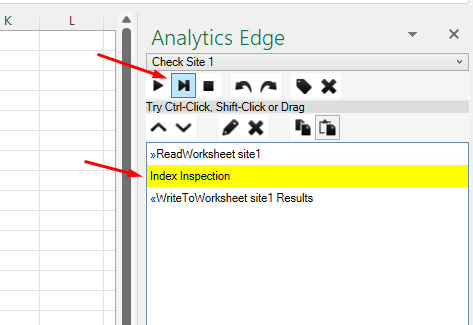
3. “Step” to your desired location in the macro:
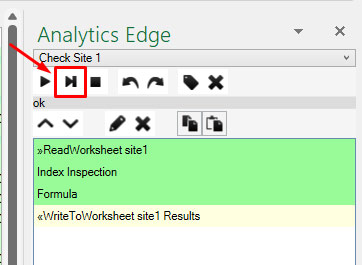
Click the instruction in the task pane BEFORE where you want to add the new function. Since we are going to compare data after the API returns results, we will add our new function after the “Index Inspection” step in our macro. So click “Index Inspection” in the task pane and then click the step button (which is located next to the run button). After the macro executes to that point, you can add additional functionality to the macro. For our purposes, we are going to add a Formula function that will compare columns after the API returns results for each url.
Note, this will only run the macro that’s showing in the task pane. It will not refresh ALL macros in the spreadsheet. So if you are monitoring several sites, and each site has its own macro, then those will need to be updated separately. I’ll cover how to do that later in the tutorial.
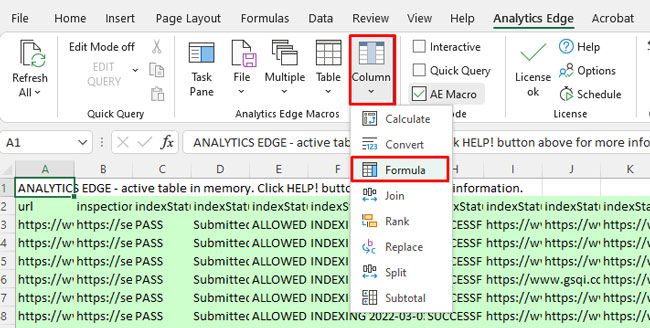
4. Add a new formula for comparing canonicals:
Once the macro runs to the point we indicated in the previous step, Analytics Edge will stop running the macro. And then you can add the new function for comparing the Google-selected and user-selected canonical urls. To do that, click the Analytics Edge tab, and then click the Column dropdown, and select “Formula” from the dropdown list.
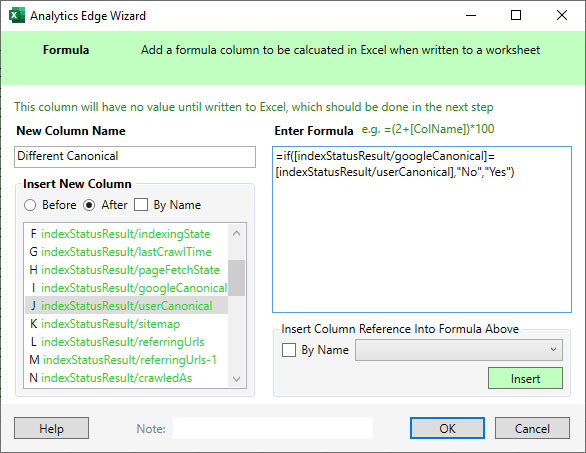
5. Add the conditional statement in the formula dialog box:
In the formula window, enter a name for the new column you want to add based on the formula we will create. You can use “Different Canonical” for this tutorial. Next, select where the column should be added in our worksheet. I want to put the new column right after the userCanonical column in the worksheet (which makes the most sense in my opinion). And finally, we are going to add a conditional statement which checks to see if the Google-selected canonical equals the user-selected Canonical. If it does, we’ll add “No” to the “Different Canonical” column, and if it’s different we’ll add “Yes”. Here is the formula you will include that accomplishes this task. Simply copy and paste this formula into the “Enter Formula” text box:
=if([indexStatusResult/googleCanonical]=[indexStatusResult/userCanonical],”No”,”Yes”)
Then click OK to apply the formula to the data that the API returned in the previous step. And then clip the step button in the Analytics Edge task pane to execute the final step in our macro, which is to write the results to a worksheet.
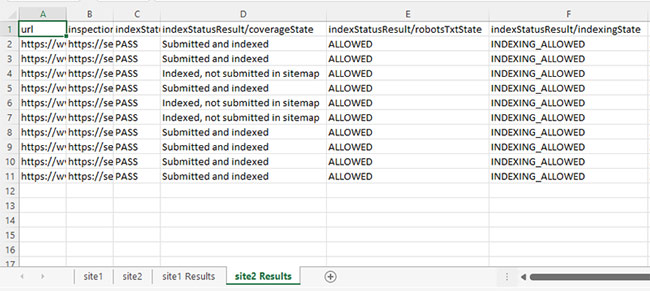
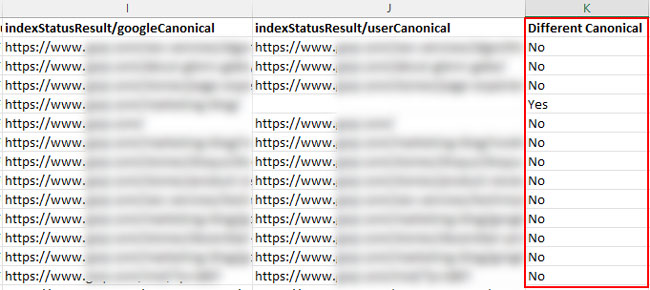
6. Check Your Results!
You can check the worksheet with the results to see the data. You should have a new column named “Different Canonical” that contains a “Yes” or “No” based on if the Google-selected canonical is different than the user-selected canonical.
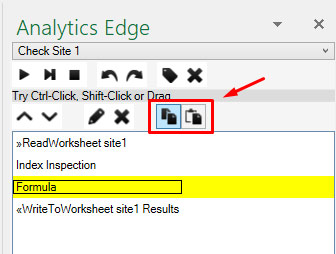
7. Copy and paste the new formula to each macro in your spreadsheet.
Congratulations, you just extended your multi-site indexing monitoring system to check for canonical differences! Now apply the same formula to all of the worksheets you created in your spreadsheet (if you are checking more than one website or GSC property). The great news is that Analytics Edge has copy and paste functionality for macros (and for specific steps in your macros).
Just highlight the new formula you created in the task pane, click the copy button, select the macro you want to copy the formula to, click the step before where you want to add the formula, and then click paste in the task pane. Boom, you just copied the formula to another macro.
8. Check indexing and canonicalization all in one shot.
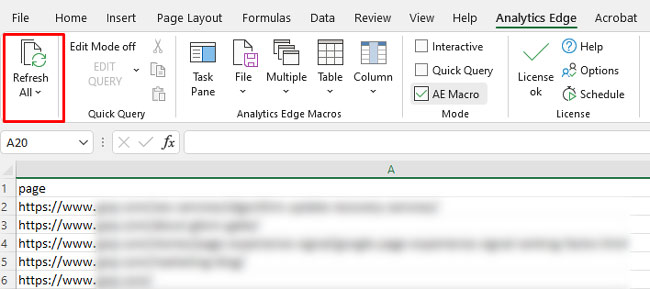
And that’s it. Your monitoring system will now check the indexing status of each url, while also detecting if the Google-selected canonical is different than the user-selected canonical. And as a reminder, all you have to do is click “Refresh All” in Analytics Edge to run all macros (which will check all of the GSC properties you are monitoring).
Important Reminder: The system is only as good (and accurate) as Google’s URL inspection system…
One thing I wanted to point out is that the indexing monitoring system is only as good as the data from Google’s URL inspection tool. And unfortunately, I’ve seen that be off sometimes during my testing. For example, it might say a url is indexed, when it’s not (or vice versa). So just keep in mind that the system isn’t foolproof… it can be inaccurate sometimes.
Summary – Continuing to improve the indexing monitoring system.
With this latest addition to the multi-site indexing monitoring system, we can now automatically check whether the Google-selected canonical is different than the user-selected canonical (which is a situation you definitely would want to dig into for urls not being indexed). Moving forward, I’ll continue to look for ways to improve the indexing monitoring system. If you decide to follow my set of tutorials for setting this up, definitely let me know if you have any questions or if you run into any issues. You can ping me on Twitter as you set up the system.
GG