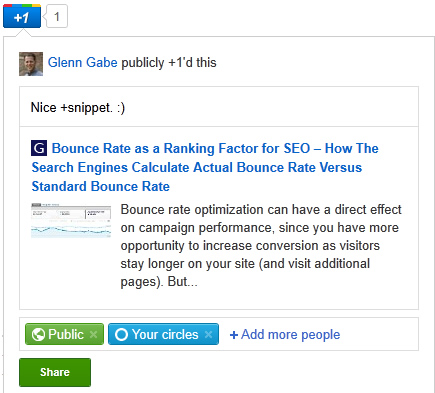
Last week Google announced that the +1 button now enables you to share content with your connections on Google+. This is the natural progression for the +1 button, which hit the scene before Google+ (the platform) did. Similar to the Like button for Facebook, it makes sense that the content you +1 can get pushed back Google+ for your connections to view, visit, share, etc. You can view a screenshot below of this in action.

When you choose to share content via the +1 button, you’ll notice that an image thumbnail sometimes shows up, along with a title and description. Google announced that they are giving site owners more control by letting them customize these elements, including the title, description, and image used for the thumbnail. This can definitely help publishers achieve “maximum sharability”. By adding some additional markup to your webpages, you can tailor the elements that show up when visitors share your content via the +1 button. I’ll cover those elements and how to add the markup below.
Maximum Sharability
I quickly mentioned this above, and wanted to explain what this means. I’m a firm believer that the image, title, and description can have a big impact on how your content gets shared, re-shared, +1’d, liked, etc. The reason is simple. Most people have hundreds of friends across various social networks (and some people have thousands of connections). The right “creative” can help your content stand out as your connections are scanning their circles in Google+. If you can catch their attention, you have a greater chance of having those people visit your content, +1 your update, and then share your post or update with their own connections. This can lead to a spike in traffic and exposure, which are both good for your business, blog, company, and digital efforts. Let’s take a look at how you can customize the snippet shared on Google+ when visitors click the +1 button.
Schema.org Attributes
In a previous post, I explained how you could customize your +1 button code to unlock exclusive content. You can check my post out in greater detail to learn more about adding the button to your site, editing the code, etc. For this post, I’m going to focus on how to add markup to your html content in order to tell Google which elements should be used for the thumbnail image, title, and description when shared. You can accomplish this by adding schema.org attributes to your content, which will tell Google which elements to use. In order to do this, you’ll need to use the Article item type when adding the code.
The three pieces of markup that you’ll need to add to your webpage include:
1. itemprop=”name”
2. itemprop=”description”
3. itemprop=”image”
In addition, you will need add an element and attribute to your opening body tag in your document, which is the itemscope element and itemtype attribute. See below.
The “name” attribute will provide the title you want to use when visitors share your content, and the “description” and “image” attributes are self-explanatory. The great part about adding this markup is that you choose which elements to use for the image, title, and description versus leaving Google in charge of doing so. For example, if you have a killer visual that you want to make sure is used, or if you want to include a great title that’s not the title tag of the page, then you should use this markup to make sure your suggestions are used. Remember “maximum sharability” that I mentioned earlier? Controlling these elements can help.
Note, if you want to understand the order of precedence that Google will employ when choosing the elements for the snippet, check out the help page about the +snippet attributes. You’ll see that Google recommends using the schema.org attributes over other methods.
+Snippet Example:
Let’s walk through a quick example. I’ve added the necessary markup to this blog post in order to show you how it works. You can walk through the following steps to add the markup to your own webpage.
1. Add ItemScope Element
The first thing you want to do is to add the itemscope element and itemtype attribute to the opening body tag. It looks like this:
2. Add The Title For Your +Snippet
Next, let’s use the title tag as the title of the snippet. To do this, you need to add the itemprop=”name” attribute to the title tag.
{your title tag goes here}
3. Add The Description For Your +Snippet:
Now let’s focus on the description for the snippet. You can choose which text to use and then add the itemprop =”description” attribute to the html element containing the description. For example, imagine the desired text was contained in a paragraph tag:
{your description goes here}
4. Add The Image That Should Be Used For The Thumbnail:
Last, let’s choose the image thumbnail that gets displayed by default. Find the image that you want to use and add the itemprop =”image” attribute to the img tag. Note, you can use any image that’s on the page in question.
That’s it! You have successfully added the necessary markup for controlling the +snippet. If you want, you can test it out this page now by clicking the +1 button above. You should see the elements that I chose for the +snippet when you share this on Google+.
The Google Rich Snippets Testing Tool
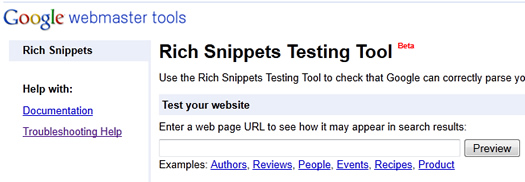
Google provides a way to test the markup on your webpages to see if your code is set up properly. It’s called the rich snippets testing tool and you can use it to test your +snippet. Simply visit the tool and then add the URL to the form. Click “Preview” and you should see the structured data that Google extracted from your webpage. You should see each attribute listed, along with the elements you chose to use in the +snippet.

Control the +Snippet
Google+ is growing rapidly, and members will be sharing more and more information there. As I covered in this post, Google is now enabling webmasters to control the snippet that gets shared, which can definitely help with exposure, +1’s, shares, etc. Using some basic markup, you can easily control the elements that gets used for your +snippet. So, in a digital world where you often can’t control how content gets shared, you can have some control here. Therefore, I recommend you add this markup. Again, think about “maximum sharability”.
GG

This is great information. People are still trying to figure out how to effectively use the +1 button and integrate it with Google+. I’m still not sure what the reasoning was for releasing the button before the network. Had it been the other way around people would have been more likely to understand its purpose.
Thanks Nick. I agree with you. I definitely think people are confused with how to best use the +1 button, customize it, etc. I also wrote a post about using the callback function, which is a cool piece of functionality built into the +1 button. I’m finding many marketers don’t know about it, or how to best use it. Thanks again for your comment.
GG
Hi,
I could not able to see the Snippet popup window of title,description and image even i clicked goolge plus one icon with google account.
Is there any settings for displaying snippet popup window in google account. Please help me.
After you click the +1 button, you should see a text box that say, “Share this on Google+”. When you click in that text box, you’ll see the +snippet. I hope that helps.
GG
As Always Glenn Brilliant!
Thanks Seth. I appreciate it!
I am not actually able to get this to work for some reason. I know since this was written we place the schema.org itemscope in the html tag though I have tried both places(body + html). I seem to have some default information, and even adding the itemprop elements on the specific page elements instead of meta data doesn’t seem to override the default snippet information. Thinking maybe there is a cache or html5 code is not working. Any ideas anyone? :) TIA!