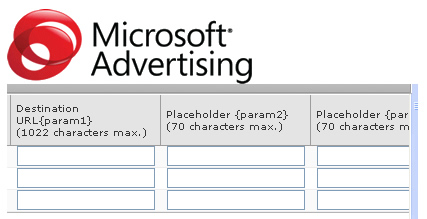
With the transition to the Microsoft and Yahoo! Search Alliance complete (and Bing now powering Yahoo), more and more marketers have been migrating campaigns to AdCenter. It makes sense, especially since the latest Search share numbers show Bing-Powered Search at ~29% (combining both Bing and Yahoo!). Although there are many similarities between Microsoft AdCenter and Google AdWords, there definitely are some important differences. One feature that I know can be confusing for search marketers making the transition to AdCenter is the usage of param1, param2, and param3 to customize ad creative and tailor destination URL’s. Using params in AdCenter can be extremely powerful in certain situations and I’ll walk you through a tutorial in the post below.
What are Params in AdCenter?
When mapping out campaigns and ad groups in AdCenter, you will probably be targeting very similar themes of keywords per ad group (which you should be doing). But, you might find that specific keywords within the same ad group show different user intent than others. So, based on user intent, you might choose to display slightly different ad text, while also driving visitors to different landing pages (even within the same ad group).
For example, imagine you created an ad group for a brand of chocolate you were selling. But, what if you had keywords that represented specific flavors of chocolate as part of the ad group? Maybe those keywords included the brand of chocolate plus the flavor like hazelnut or almond. In this case, you might choose to tailor your ad creative to display the flavor, and you might choose to send visitors directly to the category or product landing page (versus to the brand landing page). This is where params in AdCenter can be extremely helpful.
Introducing Params 1, 2, and 3:
Param1 enables you to identify custom destination URL’s by keyword, while Param2 and Param3 enable you identify specific text to insert into the ad. You can think of params as variables that can hold whatever values you want for the specific keyword at hand. Note, using Param2 and Param3 is different than simply adding the raw query that someone entered in Bing or Yahoo. You can still do that by using the {Keyword} placeholder like in AdWords, but there are situations you might want more control of the dynamic text. Specifically, using params in AdCenter can help you present a cleaner ad than using a raw query.
Example – How To Use Param1 and Param2 in AdCenter to Customize Your Ad
To keep this tutorial simple, we’ll focus on using param1 and param2 (since using param3 is just like using param2.) There is a three-part approach to using param1 and param2 in AdCenter. First, you will create a new ad group in a campaign. Then you will create a new text ad that uses both param1 and param2 placeholders. Third, you will create keywords that hold values for params 1 and 2 (so your ad can pull the right information to display for users). To clarify, you will create a text ad and insert the variables into your ad (to provide both dynamic ad text and a dynamic destination URL per keyword).
Let’s walk through a quick example by creating a new ad group. The new ad group will focus on your own brand of gourmet chocolates. We’ll use the AdCenter UI for this example:
1. Create a New Ad Group
Access one of your current campaigns and create a new ad group. I’m assuming you already know how to do this, so I won’t spend much time on the step. Name it whatever you like, such as “Chocolates”. To keep the example simple, this ad group will hold just three keywords and one text ad. The three keywords will be “glenn’s chocolate”, “glenn’s almond chocolate”, and “glenn’s hazelnut chocolate”. The ad will present custom ad text and a custom destination URL, based on the keyword at hand.
Specifically, we want to make sure that we add the words “hazelnut” or “almond” when people are searching for those keywords (along with the brand.) In paid search, it’s optimal to make sure your ads are as relevant to the query as possible. This can increase click-through, which in turn can lead to more conversions. To tailor our ad text, we will include the words we want to insert into the ad using the param2 placeholder. To tailor our destination URL, we will use the param1 placeholder.
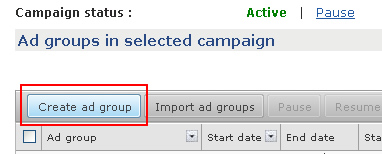
2. Customize Your Ad Using Params
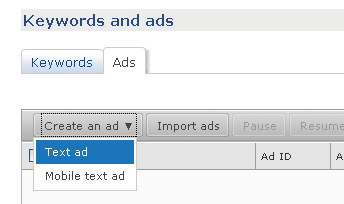
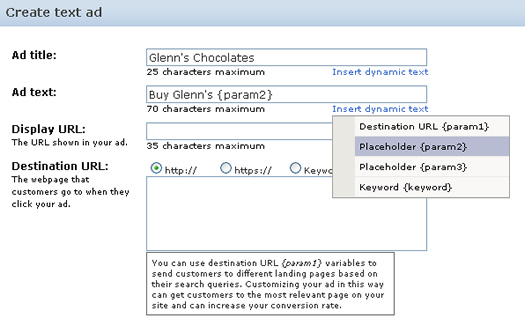
Once you create your new ad group, you will create a new text ad for the group. Click “Create an Ad” and then select “Text Ad”. This will bring up a number of text fields, including Ad Title, Ad Text, Display URL, and Destination URL.
3. Set Keyword-Level Destination URL’s
First, you’ll need to tell AdCenter that this text ad should use keyword-level destination URL’s. To do this, you should click the radio button that says “keyword destination URL”. You’ll notice that AdCenter automatically changed the destination URL to “param1”. This means that AdCenter will use the values you provide in the param1 placeholder for each keyword (I’ll cover param1 values soon).
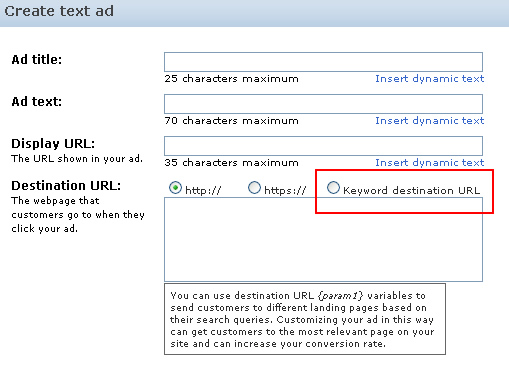
4. Insert Params in Text Ads
Now we are going to make sure that our dynamic text shows up in our ad. When using params, you can include the value for param2 in the title, ad text (description), display URL, and destination URL for the ad. For this example, we’ll add the param2 placeholder to our ad text (which is the line following the ad title.) Note, you have 70 characters to play with for ad text. Keep this in mind when creating dynamic text using params 2 or 3. To clarify, you have 70 characters for the final ad text (the ad that users will see and not the entire text using the words “param2” or “param3”). You want to make sure that the value in param2 can fit in your final ad without going over 70 characters.
Let’s start by including a simple ad title like “Glenn’s Chocolates”. Then include the following copy for your ad text (line 2 of your ad), “Buy Glenn’s Chocolate Today. Founded in 1958.” Using param2, you can insert the flavor right before “Chocolate” in the ad text by using the param2 placeholder. If we do this, then people searching for “Glenn’s hazelnut chocolate” will see an ad that says “Buy Glenn’s Hazelnut Chocolate…”, when people search for “Glenn’s almond chocolate” they will see an ad that says “Buy Glenn’s Almond Chocolate…”, and when they don’t specify a flavor the ad will read “Buy Glenn’s Gourmet Chocolate…” I’ll explain how to set this up for your keywords soon. I just wanted to clarify this point before moving forward.
Place your cursor right before “Chocolate” in your ad text and click the link for “Insert Dynamic Keyword”. When you do, you can choose the params available. Select param2 to make sure we pull from the values we are going to set up for each keyword. You will now see {param2} show up before the word “Chocolate” in your ad. Stick with me, this will all come together soon. :)
5. Save Your Ad
Click “Save” at the bottom of the window and your text ad should be all set. Then click “Next” to enter the Keywords screen.
6. Add Your Keywords
As explained earlier, we will add three keywords to this ad group (to keep the example simple). You should enter “Glenn’s chocolate”, “Glenn’s hazelnut chocolate”, and “Glenn’s almond chocolate” in the text field for keywords and then click the button “Add to keyword list”. You will then see your three keywords listed at the bottom of the page, along with text fields for your params.

7. Add Param Values Per Keyword
Remember, the text ad we created included the param2 placeholder in the ad text and uses the param1 placeholder for the destination URL. We are now going to enter those values per keyword. First, we will add specific destination URL’s for each of the three keywords in this sample ad group. Remember, we want to drive prospective customers to the most relevant landing page, based on their query. Second, we will tailor the ad text based on the keyword being triggered (by using the param2 placeholder).
Let’s start by adding specific destination URL’s in the param1 field for each keyword. For our example, we’ll send people searching for “Glenn’s chocolate” to the brand landing page, we’ll send people searching for “Glenn’s hazelnut chocolate” to the hazelnut landing page, and we’ll send people searching for “Glenn’s almond chocolate” to the almond landing page. Important Note: If you are going to use keyword-level destination URL’s via param1, then you must enter a value for param1 for each keyword. If you don’t, then your keyword will be disapproved and your ads will not trigger for that keyword.

8. Add Param2 Values for Custom Ad Text
Now that we have custom destination URL’s, let’s add text to our param2 placeholders. To accomplish this, we’ll add “Hazelnut” in the param2 field for Glenn’s hazelnut chocolate, we’ll add “Almond” for Glenn’s almond chocolate, and then add “Gourmet” for Glenn’s chocolate. We are adding “Gourmet” to make sure we still have a solid ad for people not searching for a specific flavor. You’ll see how this works when we test the ad.

9. Save Your Work
Click “Next” to save your edits. Then click “Finish” to save your settings and to return to the main screen for your campaign (which lists your new ad group).
10. Test Your New Ads
Wait a few minutes and then test your ads using the Ad Preview Tool (which can be found in the Tools menu in AdCenter). Search for your keywords and view the ad text being triggered. You should see the ad being tailored based on the keyword at hand.
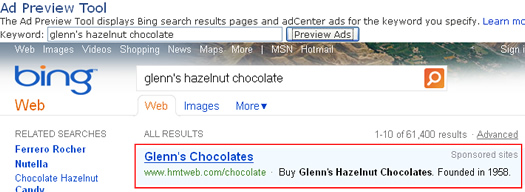
Congratulations! You just set up a system for providing the most relevant ad copy and destination URL’s for your ad group. Get ready, because here come the sales. ;)
Param Bonus: Using Param2 in the Display URL
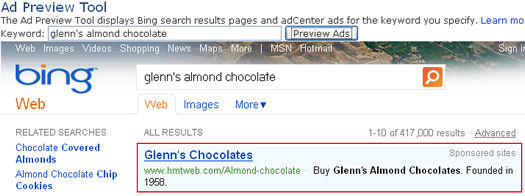
I explained earlier that you can tailor the title, ad text, or display URL using params 2 and 3. If you want to test your new skillset, go ahead and add param2 in the display URL for your ad. Including something like http://www.yourdomain.com/{param2}-chocolate will provide a descriptive display URL matching the product being searched for. See the screenshot below.
Don’t Be Afraid of Params, They Are Your Friends
Params can be a bit confusing when you are getting started with AdCenter, but don’t run away from them screaming in fear. As you can see, they can help you provide the most relevant ad copy for your prospective customers, while also sending them to the most targeted landing page. Both of which are good things to do in paid search. Remember, your goal is to convert prospective customers, and using params in AdCenter can help you accomplish that.
GG

Thank you for this article. Our adCenter reps have been recommending the use of the param2 field for the creation of ads, and this article gives a good explanation for what that field means.
Thanks Andy. I’m glad you found my post helpful. I find most people aren’t using param1 and param2, so you’re at an advantage if you implement them correctly. :)
GG