![]() In part 1 of this series I introduced the concept of tracking flash applications, why flash has been hard to track for many marketers, and I introduced the Google Analytics for Adobe Flash Component. To quickly review, the GA for flash component enables you to easily make calls directly from your ActionScript code in order to track pageviews, events, conversions, etc. in flash. It’s an important step for understanding how your flash elements contribute to the success of your website, and not just because you think it’s a killer flash app. ;-) In part 2 of my series, I will walk you through how to actually set up flash tracking using the gaforflash component (step by step in the flash authoring environment.) By the end of this tutorial, you should have a solid understanding of using the flash component and making calls to Google Analytics from within your ActionScript code. I will reference the flash movie that I created during my own testing and show the resulting Google Analytics reporting to tie it all together. So without further ado, let’s start coding. :)
In part 1 of this series I introduced the concept of tracking flash applications, why flash has been hard to track for many marketers, and I introduced the Google Analytics for Adobe Flash Component. To quickly review, the GA for flash component enables you to easily make calls directly from your ActionScript code in order to track pageviews, events, conversions, etc. in flash. It’s an important step for understanding how your flash elements contribute to the success of your website, and not just because you think it’s a killer flash app. ;-) In part 2 of my series, I will walk you through how to actually set up flash tracking using the gaforflash component (step by step in the flash authoring environment.) By the end of this tutorial, you should have a solid understanding of using the flash component and making calls to Google Analytics from within your ActionScript code. I will reference the flash movie that I created during my own testing and show the resulting Google Analytics reporting to tie it all together. So without further ado, let’s start coding. :)
Note: If you’re a small business looking to learn more about web analytics, then you should check out my internet marketing ebook, Taking Control of Your Online Marketing. There’s an entire chapter on Web Analytics covering the setup, installation, sections of reporting, how to track conversion, events, etc. It’s a great place to start.
Quick Disclaimer, Code Ahead:
As I mentioned in my first post, if you have some knowledge of developing flash movies and writing ActionScript code, then you should be able to follow along. If you aren’t familiar with developing in flash, grab your flash developer and possibly your web analyst and set up a working lunch. By the end of the tutorial, I’m confident you will see the power of using this technique to track your flash elements.
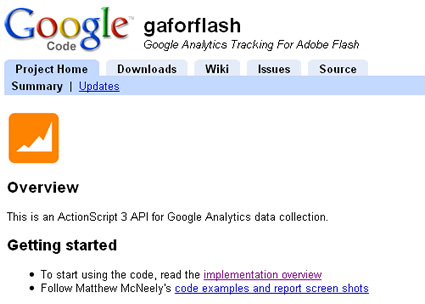
Visit the Google Code Project and Download the Components
First, visit the Google Code Project for Google Analytics for Flash (gaforflash). http://code.google.com/p/gaforflash/ Click the downloads tab at the top of the page and download the zipfile listed. The current version as of this blog post was v1.0.1. Once you download the zipfile, unzip the contents to a directory on your hard drive. Open the readme textfile and follow the instructions for copying the components to the proper directory in your Adobe flash folder. This will differ depending on if you are running a pc or a mac and you will be creating a new folder within the components directory where you will copy the files (the instructions tell you to create a Google folder and drop the components there). Once you copy the components into the new directory, then go ahead and launch flash. Again, make sure you follow the readme before launching flash.
The Google Code Project for GaforFlash:
Determine What You Are going To Track:
To me, this is the most important step (and I bet the web analysts reading this post agree!) Mapping out what you want to track is essential to having clean reporting and a structured hierarchy. You can really have some messy reporting without working through this step… We’ll keep this example very simple to keep the amount of coding down, so here’s the scenario.
You will be adding a new flash element to a category page on your website and want to track how visitors engage the flash movie and how that flash element contributes to the success of the website. In our sample flash movie, there will be a start button, which launches the rest of the flash movie. The start button is there for a reason and you’ll learn why in a second. Once someone clicks the start button, they will be presented with two product thumbnails. The goal of our sample flash movie is to get visitors to learn more about each product and then click an email button at the bottom of the flash movie to get in touch with sales. Again, this is completely made up and simple, but we need to map this out in order to know what to track. Also, we’ll track when users hover over each thumbnail and then when they click each one to reveal more information. In addition, they obviously want to track the email link at the bottom of the flash movie, since clicking the button will be a conversion in GA.
To summarize the key pageviews, events and conversions we will track:
1. A start button will trigger a pageview so you know how many people engaged the flash movie. This is so you know that the flash movie was triggered (and not just sitting on the page).
2. The two product thumbnails will trigger events when someone hovers over the thumbnail and when someone clicks them.
3. The email link at the bottom of the flash movie will trigger a pageview for when someone clicks the button. That pageview will also trigger a conversion.
4. Note: you will need to set up a conversion goal in Google Analytics for the email pageview that we trigger when visitors click the email button. This is easy to do and then will start showing up within your Goals tab in GA. You can read more about tracking goals in the GA help center. http://www.google.com/support/googleanalytics/bin/answer.py?answer=55515
Open Up Flash and Create the Necessary Assets
In order to work though this tutorial, you will need to create some simple flash assets (buttons). Don’t worry about how they look. The core point of this tutorial is that you learn how to use the flash component to make calls to Google Analytics and not to win design awards. ;) You will need to create a start button, a product thumbnail button, and an email button (which can be simply text if you want). Once you have quickly created each button, proceed with the rest of the tutorial.
Import the Tracking Libraries
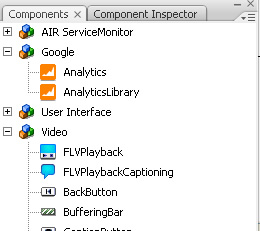
First, make sure your current flash movie is targeting ActionScript 3. Open up the publish settings dialog box (control shift F12), click the flash tab, and use the dropdown to select an ActionScript version to target. Choose ActionScript 3. Next, you need to drag an instance of the AnalyticsLibrary Component to the stage in order to import the code libraries. Create a new layer in flash and open the components panel (control F7). You should see a category named Google (which you created earlier in this tutorial). If you don’t see the Google category, then go back to the beginning of this tutorial and follow the directions again in the readme text file that was part of the download. Click the plus sign (+) next to Google and drag the AnalyticsLibrary component to the stage. Don’t worry where you place it on the stage. It should now be present in your project library (you should also see it listed in your library. Click Control L to see your project library.) Keep in mind I’m referring to your project library, which holds all of the assets you create in your flash movie (buttons, movie clips, images, components, etc.) I’m not referring to code libraries, which we will discuss shortly.
Finding the AnalyticsLibrary Component in Flash:
Next, create an Actions layer and select frame 1 of the timeline in that layer. Click F9 to open the Actions window (which is where you write ActionScript code). Since we are using the Analytics Library Component to make calls directly from our ActionScript 3 code, you will need to import the libraries that you will use to instantiate a tracking object and make calls to Google Analytics. If you don’t import the libraries, you will not be able to make calls to GA.
Here is what you should add to frame 1 of the actions layer:
import com.google.analytics.AnalyticsTracker;
import com.google.analytics.GATracker;
var tracker:AnalyticsTracker = new GATracker( this, “UA-111-222”, “AS3”, true );
A Quick Explanation of the Code:
Note, you would obviously want to add your own GA account number so the data is sent to the correct profile. i.e. Don’t keep 111-222 as the web property ID. The first two lines import the necessary code libraries and the third line of code initializes the tracking object. Keep “this” as the first parameter, which references the current display object. Enter your own GA account number for the second parameter, you can keep AS3 as the third parameter for this tutorial, and keep “true” as the fourth parameter. That sets the debug mode. When true, you will see a trace of all tracking events occurring. When false, this will not be visible. Also, you can read the gaforflash documentation to learn more about each parameter.
Making Calls From ActionScript to GA:
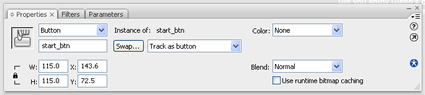
Now, if you create a start button that visitors have to click in order to see anything in your flash movie, then we can logically target that click as a pageview. Then we can view in GA how many people started the flash movie. That would answer one of the first questions from your CMO, right? :) So create a new layer in your flash movie called Start Button and add your button to frame 1 of this layer. To stop the flash movie from playing before someone clicks the start button, simply add a stop action on frame 5 in your Actions layer. Create new keyframe on frame 5 and enter this.stop(); as the code. Again, the intent of this tutorial is not to teach you how to use flash, but I’ll add some tips as we move along. Select the start button on the stage by clicking it once and give it an instance name of start_btn in the properties panel. You can click Control F3 to bring up the properties panel if it’s not on screen. We need to give the button an instance name in order to target it in ActionScript. If you don’t give it an instance name, your code will not work.
Creating an Instance Name in the Properties Panel:
Now go back to frame 1 of your actions layer and open the actions window again (click F9). Below the code we first added (importing the libraries and initializing a tracking object), add the following lines of code. I will explain them in a second… You can give yourself some space by clicking enter a few times. Your code does not need to be lumped together!
//functionality for start button
start_btn.addEventListener( MouseEvent.CLICK, startExample );
function startExample( event:Event):void {
//we know that the user engaged the flash movie (they clicked start)
tracker.trackPageview(“/GAFlash/Start”);
play();
}
The Code Explained:
The first line is a comment, which is good programming practice. You can simply describe the code that follows. This will not be visible to anyone but you as a programmer. The second line is an event handler for the start button. It targets the instance name start_btn, which we set up earlier. This is why we needed to create an instance name. Now our code will look for a mouse event (CLICK) for the start button and then trigger the function called startExample, which I will cover in a second. Event handlers enable you to react to events in your flash movies. They are critical to creating advanced functionality in your flash applications.
The function startExample() will be called when someone clicks the start button. This function uses our tracker object to trigger the trackPageview method and then plays the main timeline in your flash movie, using the play(); action. Remember, we want the visitor to see the rest of our flash movie after clicking the start button. The trackPageview method tells Google Analytics to track a specific pageview when something happens. The page will show up in GA reporting as /GAFlash/Start in your content tab, as if someone actually visited a page on the website. Pretty cool, right? So, you’ll be able to go into GA and click the content tab and see how many times this “page” was triggered. Nice. That wasn’t so bad, was it? That was all done in less than 15 lines of code.
Tracking the Product Thumbnails:
You will use the same methodology for tracking the two product thumbnails in your flash movie. Remember, we want to know when someone clicks each thumbnail, but we’ll be adding one more event…when someone hovers over the thumbnails. You might find that people were interested enough to hover over a product, but not trigger it. If you see enough of this behavior, you might want to dig deeper to find out what’s causing it. That’s just a simple example and you should work with your web analyst to determine what to track for your specific website and flash content.
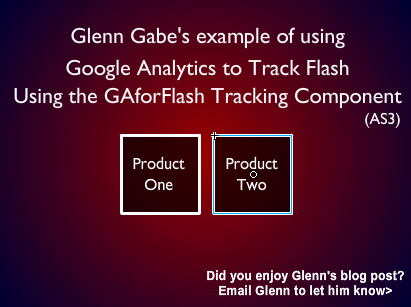
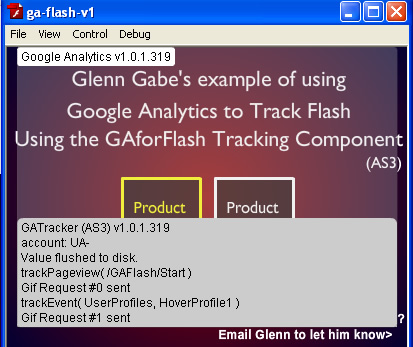
A Screenshot of the 2 Product Thumbnails for this Example:
We used the trackPageview method for the start button, but we will use trackEvent for the thumbnails. Examples of events might be clicking a button, hovering over that button, visiting a specific area of a flash movie, etc. GA now provides an Event Tracking tab within your Content tab. Within the Event Tracking tab, you can view categories of events, the specific actions users took, the labels associated with those events, trending, etc. So, we’ll track two events with each product thumbnail in our flash movie. I will only cover the first thumbnail here and you can copy this process to apply event tracking to the second thumbnail.
After someone clicks the start button, you used the play(); action to play the main timeline. At frame 20 on your main timeline, create a new stop action in your actions layer. Add a new keyframe at frame 20 and open the Actions windows. Enter this.stop(); as the code. Then create a new layer for your product thumbnails and add the buttons that you created earlier in this tutorial. Note, for this example, add them to frame 1 so your code can target the button instances. You can place them off the stage (off-screen) in frame 1 so they aren’t visible and then move them on-stage later in the flash movie when visitors need to see them. If they aren’t on the stage in frame 1, the event handlers you create targeting these buttons won’t work. Give each instance on the stage a unique instance name, like product1_btn and product2_btn. You do this by selecting each button and then entering an instance name in the properties panel. Again, we need to give them instance names in order to target them in our ActionScript code. Once you do this, go back to frame 1 of your Actions layer, click F9 to open the Actions window again and add the following code:
//functionality for product btn 1
product1_btn.addEventListener( MouseEvent.CLICK, clickProduct1 );
product1_btn.addEventListener( MouseEvent.MOUSE_OVER, hoverProduct1 );
function hoverProduct1( event:Event):void {
tracker.trackEvent(“Products”, “HoverProduct1”);
}
function clickProduct1( event:Event):void {
tracker.trackEvent(“Products”, “ClickProduct1”);
gotoAndStop(“product1”);
}
So we have two event handlers for the product1_btn. The first event handler will handle the CLICK mouse event and the second will handle the MOUSE_OVER mouse event. MOUSE_OVER is when someone hovers over the button (as you probably guessed). Checking the clickProduct1 function, you see that we are using trackEvent to send an event tracking call to Google Analytics. The two parameters are Category and Action respectively. I lumped both product buttons under the same category called “Products” and then gave specific events to each click and hover (HoverProduct1 and ClickProduct1). You will be able to drill into event categories in your GA reporting and then see specific actions, along with trending.
Important: When you set up the code for the second product button, make sure your event handlers target product2_btn versus product1_btn and that you trigger specific functions, such as clickProduct2 and hoverProduct2 versus clickProduct1 and hoverProduct1. You definitely don’t want to call the wrong functions, as this will ultimately skew your reporting or throw errors in your flash movie. i.e. Someone might click the profile 2 button, but you triggered the profile 1 tracking.
The Email Link, Our Conversion in Flash
Last, but not least, we want to track when people click the email button. We have decided that clicking this button will be a conversion for our flash movie. Create a new layer in your flash movie and add your email button to frame 1 of this layer. Select the email button on the stage by clicking it and give it an instance name of emailMe_btn. Then go back to frame 1 of your Actions layer and open the actions window (hit F9). Below the code we added earlier, add the following lines of code:
//functionality for email button, this is also our conversion
emailMe_btn.addEventListener( MouseEvent.CLICK, onButtonClick );
function onButtonClick ( event:Event ):void
{
tracker.trackPageview(“/GAFlash/EmailMe”);
}
OK, so when visitors click the email button, we will trigger the trackPageview method to track that click as a pageview in Google Analytics. The page will show up as /GAFlash/EmailMe in your Content tab. In addition, since this is a conversion, you can set up a conversion goal in Google Analytics targeting that page. Then conversions will show up in your Goals tab within Google Analytics. Now you can tell your CMO how many visitors are converting within your flash movie. That’s not as generic as “Sorry, we don’t know”, right? ;-)
Quickly Test and Track Your Flash Movie
In the first piece of code we added in this tutorial, we included this line:
var tracker:AnalyticsTracker = new GATracker( this, “UA-111-222”, “AS3”, true );
As mentioned earlier, the “true” parameter tells flash whether you want to run debug mode. If you set this to true, then you can see a trace of your calls to Google Analytics. I recommend turning this on during your testing and then when you are ready to go live, you can turn if off by setting the parameter to “false”. Go ahead and test your movie and click the start button. You should see a message when the call is made to GA, and if it was successful. Then as you interact with your product thumbnails, you will also see the calls being made. Last, as you click the email button, you should also see the call being made. If all looks good, then you can add your published flash movie to an html page and then upload the files to your website. Remember to set debug to false as mentioned earlier or else everyone viewing with your flash movie will see the trace of your calls. Then click away and thoroughly test out your flash movie, try different browsers, platforms, etc. Make sure you trigger each of the elements enough and wait for GA to show you the results in your reporting.
Enabling Debug Mode to View a Trace of Your Calls:
My Working Example of Using GAforFlash
I uploaded my example of using the Google Analytics for Adobe Flash Component in case you wanted to see how it looked and worked. I know it’s hard sometimes to follow along without seeing the final product.
Checking Your Google Analytics Reporting
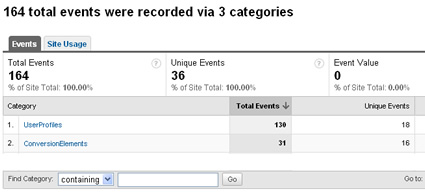
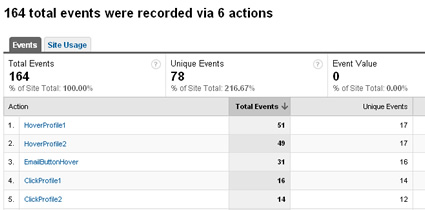
I’m going to show you what the reporting looked like for my own example. The first thing I did was click the Content Tab in Google Analytics and then Event Tracking within that tab. I immediately could see the total number of events that took place, visits with an event, etc. {See screenshots below.} Clicking the Categories tab displayed the event categories we set up earlier, such as Products (Note, I used UserProfiles in my example versus Products so that’s what you will see in the screenshots below). This category includes the actions of hovering and clicking the product thumbnails. This is why mapping out what you want to track is important. You want a clear hierarchy in your reporting. Drilling into each category, I could see the actions that took place like HoverProfile1, ClickProfile2, etc. Note, I used the word “profile” in my testing versus products. If you click the Actions tab (below categories), you will see all of your actions listed, regardless of category. We didn’t add the optional parameter for Labels so you won’t see anything there (in case you were wondering).
The Event Tracking Overview Report in Google Analytics:
![]()
The Events Category Page in Google Analytics:
The Event Actions Report in Google Analytics:
Pageviews and Conversions
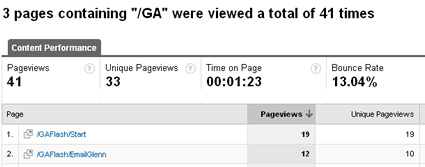
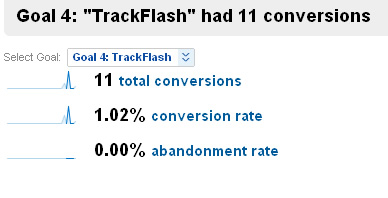
Remember we wanted to know how many people started our flash movie (after clicking the start button)? Well if you go into the Content Tab and check top content, you will see the /GAFlash/Start page listed. The number of pageviews shows how many times visitors started the flash movie. In addition, you can view /GAFlash/EmailMe, which shows the number of times the email button was clicked. And since we set this up as a conversion, you can click the Goals tab and see your TrackFlash conversion listed. Drilling into that conversion goal will also reveal conversion rate. And since it’s a conversion goal, you can see conversion by traffic source, campaign, keyword, etc. That’s the benefit of setting up conversion goals… So, you might find that organic search traffic converted 10x as much as paid search, or that visitors arriving via your email marketing didn’t even trigger your flash movie, so on and so forth.
Viewing Flash Pageviews in the Top Content Report in Google Analytics:
Viewing a Flash Conversion in Google Analytics:
Summary
OK, we’ve definitely covered a lot in Part 2. Either your head is reeling or you’re excited to use the gaforflash component in your own projects (or both!) Take your time and test our different scenarios. Work with your flash development team and your web analysts to map out how to best track your flash apps. You never know, it very well could lead to more flash application work… like if you told your CMO that 25% of the people interacting with your flash movie converted! :) Imagine if you could glean insights from your flash content versus it just being slick and pretty. And I’ll take data over pretty any day of the week. ;-)
GG
Read Part 1 of this Series on Tracking Flash in Google Analytics